Aiseesoft Telephone Mirror Free License Key for 1 Yr (Giveaway)
Aiseesoft Telephone Mirror Free License Key is a robust software program software that enables customers to reflect their Android or iOS gadget screens to their pc.
Telephone Mirror is a software that means that you can showcase your cell gadget’s display on a much bigger display. Its interface is straightforward to make use of, and its options are superior, making it easy to view pictures and movies, play video games, and entry apps in your PC or Mac.
This text explores the benefits of using the Aiseesoft Telephone Mirror license plate, and it additionally provides a complimentary license key that grants full entry to the software program’s functionalities.
In the event you’re somebody who enjoys gaming, content material creation, or just desires a much bigger display, Aiseesoft Telephone Mirror is a necessary software to have at your disposal.
Associated- Aiseesoft Slideshow Creator License Key Free for 1 Yr
About Aiseesoft Telephone Mirror
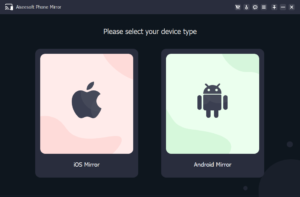
Aiseesoft Telephone Mirror is a software program software that allows customers to reflect their Android or iOS cell gadget screens onto their pc screens. This enables customers to view and work together with their cell content material on a bigger show, offering a extra immersive expertise.
With Aiseesoft Telephone Mirror, customers can simply share pictures, movies, and different content material with others or just get pleasure from a bigger display whereas gaming or utilizing apps.
The software program is user-friendly and helps a variety of gadgets, making it a super resolution for anybody seeking to mirror their cell screens onto their computer systems.
Among the key options of Aiseesoft Telephone Mirror embrace:
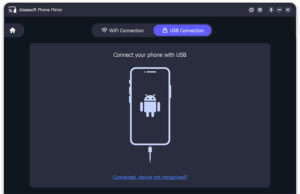
- Help for Android and iOS gadgets: The software program is appropriate with Android and iOS gadgets, making it straightforward to reflect your telephone or pill display to your pc.
- Excessive-quality mirroring: Aiseesoft Telephone Mirror provides high-quality mirroring with easy and clear visuals. You may alter the decision and high quality settings to fit your preferences.
- Management your gadget out of your pc: With the Aiseesoft Telephone Mirror license key, you may management your cell gadget out of your pc, utilizing your mouse and keyboard. This makes it simpler to work together along with your cell content material and use your apps.
- Document your display: The software program additionally provides display recording options, permitting you to seize video and audio out of your cell gadget display.
- Customizable settings: Aiseesoft Telephone Mirror provides a spread of customizable settings, similar to display rotation and show mode, permitting you to tailor your mirroring expertise to your preferences.
Aiseesoft Telephone Mirror Free License Key for 1 Yr
To start with, go to the official giveaway web page from here. Enter your Title & E-mail handle and test the “Agree with Phrases” choice. Click on the I’m not a Robotic choice & hit the “Register” button.
Now open your e-mail and also you’ll obtain an electronic mail with an annual license or license plate for Aiseesoft Telephone Mirror.
Obtain the installer from here, in the event you haven’t put in this software program. Run the setup file and observe the on-screen directions to finish the set up.
As soon as performed, launch the software program and click on on the “Key” icon from the highest menu.
Now enter your e-mail handle and the license plate that you simply’ve acquired in your e-mail.
Lastly, hit the “Activate” button and you might be performed!
So that is all it is advisable know concerning methods to get Aiseesoft Telephone Mirror Free License Key for 1 Yr. This software program is the perfect resolution for many who need to solid their cell display to greater screens.
I hope you want this text and ensure to avail your free license plate because the giveaway can expire anytime.
Associated- Aiseesoft Display Recorder Free License Key for 1 Yr (Home windows)