On Home windows 11, you possibly can allow virtualization within the UEFI (BIOS) in at the least two methods, and on this information, I’ll present you ways. Virtualization is a know-how assist constructed into most processors, corresponding to these from Intel and AMD. The know-how permits your laptop to run completely different working techniques alongside Home windows 11, corresponding to Android, Linux distributions, or one other model of Home windows via options like Home windows Subsystem for Android (WSA), Home windows Subsystem for Linux (WSL), or utilizing a standard digital machine.
Laptops and desktop computer systems often have the virtualization characteristic enabled by default within the Unified Extensible Firmware Interface (UEFI), however typically, you’ll have to allow the characteristic manually. If that is so, Home windows 11 permits you to activate virtualization in at the least two methods, together with via the Settings app or straight accessing the firmware from boot.
On this information, I’ll train you the simple steps to allow virtualization on the motherboard’s firmware on Home windows 11.
- Enable virtualization inside UEFI (BIOS) from WinRE
- Enable virtualization inside UEFI (BIOS) from boot
Allow virtualization inside UEFI (BIOS) from WinRE
To allow virtualization on AMD or Intel UEFI (BIOS) via the Home windows Restoration Setting (WinRE), use these steps:
-
Open Settings on Home windows 11.
-
Click on on System.
-
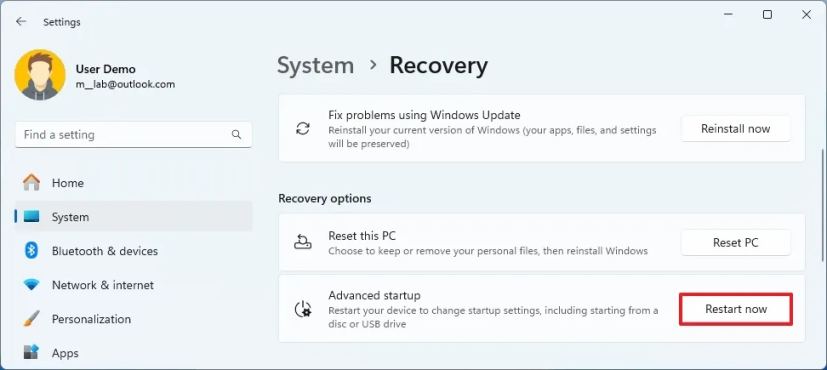
Click on on Restoration.
-
Click on the Restart now button for the “Superior startup” setting beneath the “Restoration choices” part.
-
Click on on Troubleshoot.
-
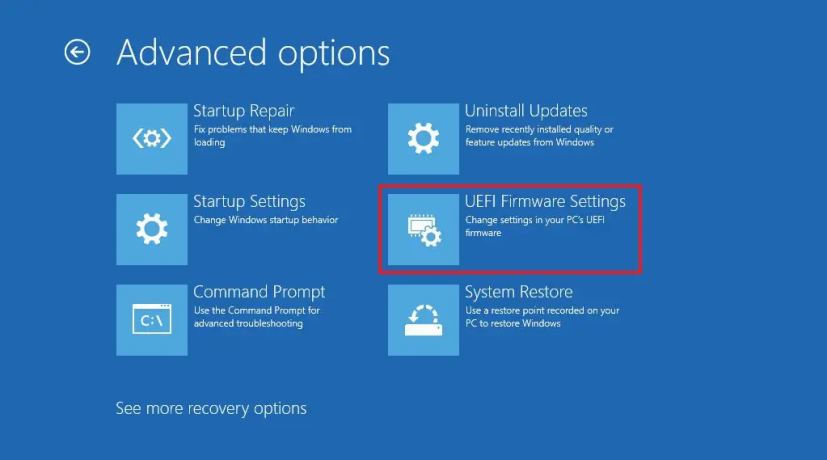
Click on on Superior choices.
-
Click on the “UEFI Firmware Settings” possibility.
-
Click on the Restart button.
-
Open the Configuration, Safety, or Superior web page (the identify of the web page will rely in your motherboard producer).
-
Choose the “Virtualization Know-how,” “Intel Digital Know-how,” or “SVM Mode possibility” (the characteristic identify will even rely upon the gadget producer).
-
Allow the virtualization characteristic on the motherboard.
-
Save the UEFI (BIOS) settings (often by urgent the F10 key).
When you full the steps, the pc will allow virtualization on the {hardware} degree, and now you can configure your most well-liked hypervisor (corresponding to Microsoft Hyper-V) to run digital machines on Home windows 11.
Alternatively, you possibly can entry the Home windows Restoration Setting (WinRE) from Automated Restore.
When you’ve got a Dell system, you’ll often must allow “Virtualization” and “Virtualization for Direct-IO (or VT-d)” from the “Superior > Virtualization” or “Virtualization Help > Virtualization” tab.
On an HP system, you have to enter the “Configuration” tab after which choose the “Virtualization Know-how” possibility. In some HP computer systems, you’ll should enter the “System Safety” tab from the “Safety” menu after which allow the “Virtualization Know-how (VTx)” possibility.
When you’ve got a desktop laptop with a motherboard from ASRock, Gigabyte, Asus, EVGA, or one other producer, you have to verify the gadget documentation as a result of nearly each mannequin has a unique option to allow this characteristic.
Allow virtualization inside UEFI (BIOS) from boot
To allow virtualization by booting into the UEFI firmware on Intel or AMD motherboards, use these steps:
-
Activate the pc.
-
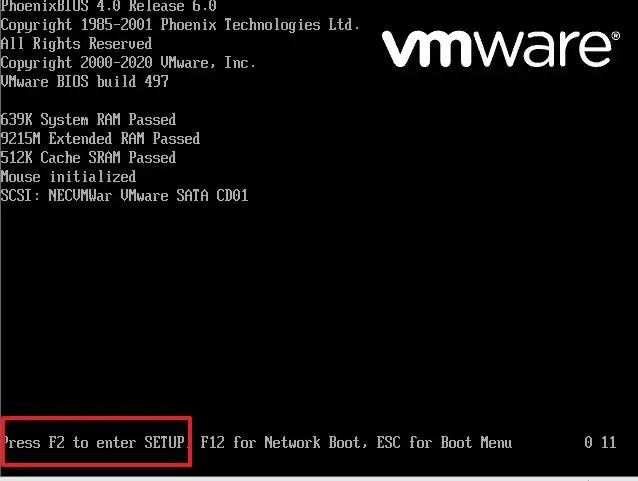
Verify the important thing that opens the firmware throughout boot. (It’s essential to do that rapidly.)
-
Press the steered key a number of occasions to enter the UEFI. Sometimes, you have to press the ESC, Delete, or one of many Perform keys (F1, F2, F10, F12, and so on.).
-
Open the Configuration, Safety, or Superior web page (the identify of the web page will rely in your motherboard producer).
-
Choose the “Virtualization Know-how,” “Intel Digital Know-how,” or “SVM Mode possibility” (the characteristic identify will even rely upon the gadget producer).
-
Allow the virtualization characteristic on the motherboard.
-
Save the UEFI (BIOS) settings (often by urgent the F10 key).
After you full the steps, the pc will allow the virtualization characteristic.
It’s vital to notice that many individuals nonetheless consult with UEFI as BIOS (Fundamental Enter Output System). Nonetheless, BIOS is an older firmware sort that was changed by UEFI. Home windows 11 solely helps the UEFI firmware sort, so this information solely focuses on accessing the fashionable firmware sort.
When you use VirtualBox, you don’t must allow this know-how within the firmware. You solely must allow the “Digital Machine Platform” characteristic on Home windows 11.
Replace Could 20, 2024: This information has been up to date to make sure accuracy and mirror modifications to the method.