A number of customers complained of getting an error 0x80370102 once they had been making an attempt to put in WSL2 Ubuntu on their Home windows 11 units. Such errors principally happen in the course of the set up of a Linux distribution in order that one can entry Home windows Subsystem for Linux OS.
If you’re additionally dealing with this problem and are nonetheless questioning what to do subsequent, learn this tutorial to be taught what causes this problem and find out how to repair it on Home windows 11 PC.

What causes WSL2 Ubuntu gained’t launch Error 0x80370102?
The “WSL2 Ubuntu gained’t launch error 0x80370102” may happen when your system meets one or two of the under circumstances –
- Turned ON hardware virtualization inside BIOS
- Disabled Hyper-V
- Disabled Nested Virtualization Settings
- Memory Issues (RAM size is less than required)
- Upgrading WSL from model 1.0 to 2.0 – If so, wait until the replace completes. Restart Home windows 11/10 subsequent, and try once more to launch the Digital machine.
- Unstable Home windows Insider Preview – In the event you had not too long ago upgraded to an unstable Home windows Insider preview, this error may happen. With the intention to repair this problem then, you need to both downgrade to a secure model or look ahead to the put in working system to turn into secure.
Examine if {Hardware} Virtualization is enabled or not
To run any digital machine on Home windows 11, the {hardware} virtualization should stay enabled. If you’re certain that this function is disabled in your pc, skip this part, and comply with the following resolution. Else, verify the present standing of the {hardware} virtualization through these easy steps –
- Press Ctrl + Shift + Enter keys altogether to begin Process Supervisor.
- Go to the Performances tab, choose CPU and see what’s written subsequent to Virtualization.

- If it’s enabled, digital machines are allowed to run in your pc. In case it shows “disabled”, allow it through coming into the system BIOS.
1] Allow {Hardware} Virtualization inside BIOS (if not already)
As acknowledged above, {hardware} virtualization should stay enabled on Home windows 11/10 to run any digital machine, flip On this function by doing the next –
- Restart Home windows first and whereas it’s rebooting, hold urgent the boot key.
- The boot key varies from one producer to a different. So, verify for it on the person information that got here together with the pc or just search with the producer’s identify on-line.
- Probably the most generally used perform keys are as follows – Del, Esc, f1, f2, or F4.
- While you boot into your system’s BIOS, look out for the CPU configuration part. You might discover this beneath both Processor, CPU config, or Chipset.
- Seek for Virtualization setting and when discovered, flip this function ON. You might discover this function beneath totally different alias like AMD-V, Hyper-V, SVM, VT-X, and many others.
- After you allow the virtualization setting, press F10 to avoid wasting and are available out of the system’s BIOS.
2] Allow Hyper-V on Home windows 11
In case the error 0x80370102 happens even after enabling the {Hardware} Virtualization beneath BIOS, the Hyper-V will need to have been disabled in your PC. So, allow this function beneath Home windows Options. Right here’s how it’s possible you’ll allow this setting in your pc –
- Press Win + S to launch the Search window.
- Kind “Home windows Options on or off” within the textual content discipline, and click on on the highest consequence.
- Scroll down and find Hyper-V.
- When discovered, tick the checkbox obtainable left of it.

Observe: While you’re inside Home windows options window, be sure that to allow the Digital Machine Platform function as nicely. You might find this function by scrolling down somewhat additional.
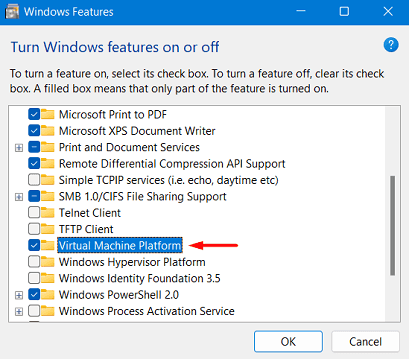
- Click on OK to verify and save the present configuration.
Restart your PC subsequent and see if this resolves the error 0x80370102 in your machine.
3] Configure Nested Virtualization Settings
If you’re nonetheless encountering points whereas launching WSL2 Ubuntu, you need to allow nested virtualization on Home windows 11. That is mainly a function that enables customers to run Hyper-V within a Hyper-V digital machine (VM). Enabling this, one could even run a Visible Studio telephone emulator on a digital machine. That is to check configurations which will in any other case require multiple host.
Right here’s find out how to expose virtualization settings on Home windows 11 –
- To start with, flip off your digital machine inside Hyper-V Supervisor.
- Proper-click on the Home windows icon and select – Home windows Terminal (Admin).
- The terminal will default land into the Home windows PowerShell (Admin).
- Copy/paste the cmdlet supplied under and press Enter –
Set-VMProcessor <VMName> -ExposeVirtualizationExtensions $true
- That’s it, nested virtualization is now energetic in your pc.
Enhance RAM Settings
Now that you’ve configured virtualization settings, be sure that to extend the reminiscence restrict as nicely to handle the error 0x80370102. Right here’s what you’ll want to do subsequent –
- Open Hyper-V Supervisor and right-click in your digital machine.
- Click on Settings on the context menu.
- On the left navigation pane, choose Reminiscence.
- Modify the Startup RAM worth by doubling it and uncheck the field left of “Allow Dynamic Reminiscence”.
- Click on Apply then OK to avoid wasting this configuration.
Alternatively, you might also improve the RAM restrict by executing the command under on Home windows PowerShell (Admin) –
Get-VM MyVM | Set-VMMemory -DynamicMemoryEnabled $True -MaximumBytes 2048MB -MinimumBytes 1024MB -StartupBytes 2048MB
Observe: You might alter the worth subsequent to most bytes, minimal bytes, or Startup bytes as per your individual requirement.
After you’re finished modifying the Reminiscence restrict, begin once more your digital machine. This time it ought to run completely okay. To launch your digital machine, right-click on it, and hit the choice – Join.
I hope this information helps to repair the error 0x80370102 in your Home windows 11 PC.