Though Home windows 11 is essentially the most safe model of the working system, you possibly can nonetheless add some customized configurations and comply with finest practices to enhance the safety of your system. For example, as a part of the most effective safety practices, you possibly can examine for system updates and scan the pc for viruses. It’s also possible to configure security measures, corresponding to ransomware and phishing safety, firewall, biometric authentication, encryption, and different most sonicated options like Sensible App Management and Core Isolation.
If it’s essential to browse a web site that doesn’t appear reliable, the Microsoft Defender Utility Guard can create an remoted surroundings with out risking malicious code or hackers from making an attempt to entry the system. Moreover, if it’s important to set up an utility from an untrusted supply, you utilize Home windows Sandbox to create a light-weight digital machine to check the applying with out placing the primary set up in danger.
On this information, I define a set of the most effective safety settings for Home windows 11 in 2024.
Home windows 11 finest safety settings to alter in 2024
These are the most effective safety settings to use on Home windows 11. (You don’t should configure each one in all them. You must solely use those you take into account the most effective to your state of affairs.)
1. Set up system updates
On Home windows 11, putting in the newest updates is without doubt one of the finest methods to maintain the system and recordsdata safe for the reason that packages can repair bugs, improve safety, and enhance system efficiency.
To put in Home windows 11 updates manually, use these steps:
-
Open Settings on Home windows 11.
-
Click on on Home windows Replace.
-
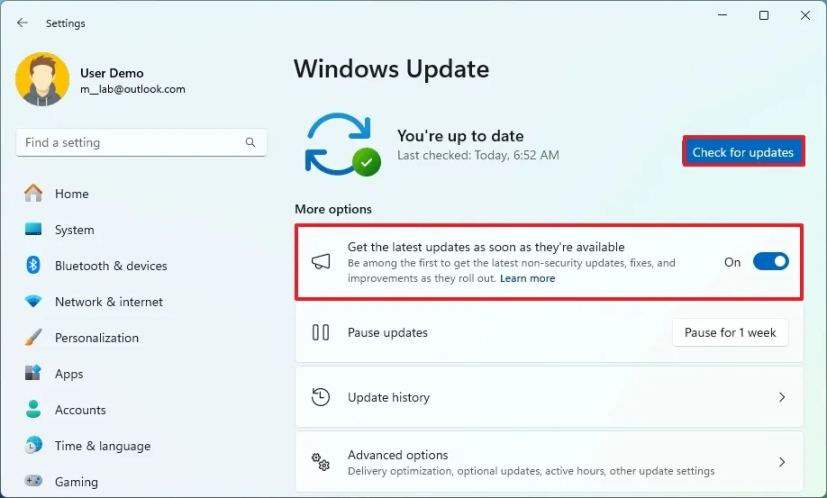
Click on the Test for updates button.
-
(Elective) Activate the “Get the newest updates as quickly as they’re out there” toggle swap.
-
Click on the “Obtain and set up” button to use a preview of an upcoming replace (if relevant).
Fast be aware: Elective updates often embody non-security adjustments that Microsoft plans to launch within the subsequent Patch Tuesday rollout. -
Click on the Restart now button.
When you full the steps, if an replace is accessible, it’ll obtain and set up robotically on Home windows 11.
Along with utilizing the Home windows Replace settings, you possibly can replace the system by way of completely different strategies, corresponding to Command Immediate, PowerShell, and the Microsoft Replace Catalog web site.
1. Scan pc for viruses
Home windows 11 has the Microsoft Defender Antivirus to detect and take away just about any malware, corresponding to viruses, ransomware, spyware and adware, rootkits, and so forth. In the event you suspect your pc has been compromised, you possibly can all the time carry out a full or offline scan (if the system is contaminated with a tricky virus) to make sure the system is freed from malware. As well as, you should utilize periodic scanning on gadgets with a third-party antivirus.
Full virus scan
To carry out a full virus scan on Home windows 11, use these steps:
-
Open Begin.
-
Seek for Home windows Safety and click on the highest consequence to open the app.
-
Click on on Virus & risk safety.
-
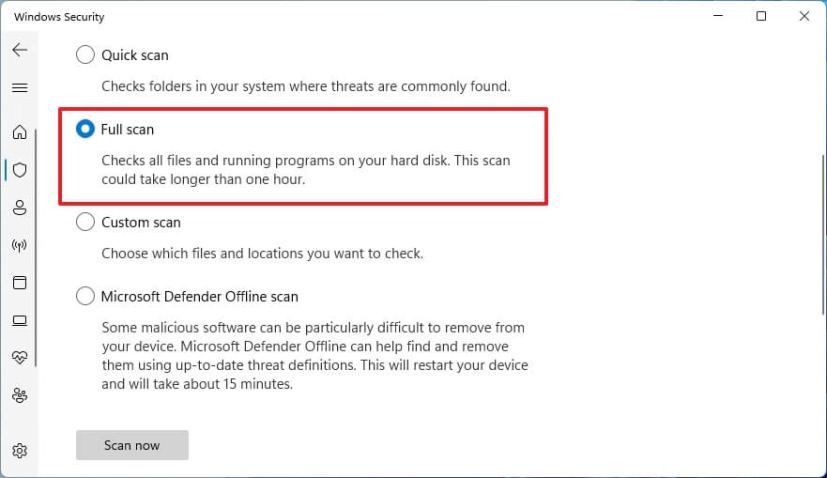
Click on on Scan choices under the “Present threats” part.

-
Choose the Full scan choice to examine the complete system for viruses and some other kind of malware.
-
Click on the Scan now button.
After you full the steps, Microsoft Defender Antivirus will scan the pc for malware. If something is detected, the anti-malware robotically removes (or quarantines) the threats.
It’s also possible to use the antivirus with Command Immediate and PowerShell.
Offline virus scan
To run an offline virus scan on Home windows 11, use these steps:
-
Open Home windows Safety.
-
Click on on Virus & risk safety.
-
Click on on Scan choices underneath the “Present threats” part.
-
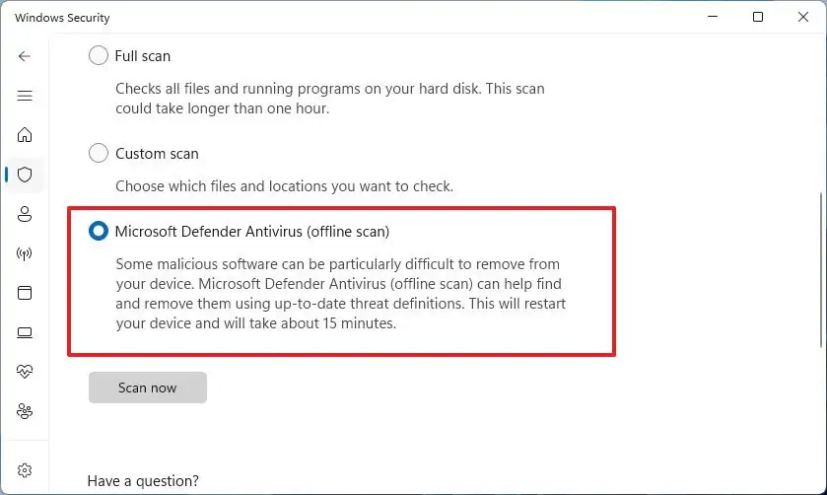
Test the “Microsoft Defender Offline scan” possibility.
-
Click on the Scan now button.
-
Click on the Scan button.
When you full the steps, the pc will restart robotically within the restoration surroundings, and Microsoft Defender will begin the total virus scan. If the Home windows 11 antivirus detects any virus, rootkit, or one other kind of malware, it robotically removes it.
Allow periodic scanning
If in case you have one other antivirus answer, one other finest safety follow is to allow “periodic scanning” on Home windows 11, one other finest function that periodically scans and removes threats different antivirus software program might have missed.
To allow “periodic scanning” on Microsoft Defender Antivirus for Home windows 11, use these steps:
-
Open Home windows Safety.
-
Click on on Virus & risk safety.
-
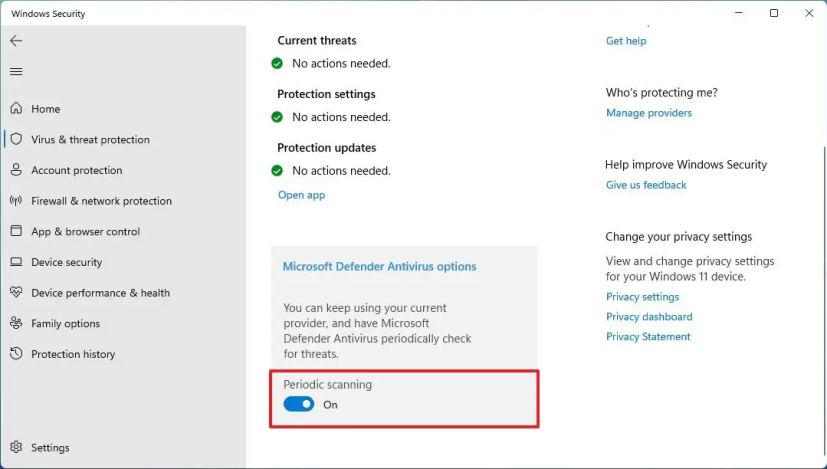
Click on the “Microsoft Defender Antivirus choices” setting.
-
Activate the Periodic scanning toggle swap.
After you full the steps, the Home windows 11 antivirus will use the “Computerized Upkeep” function to run the scans at optimum occasions to attenuate the affect on efficiency and battery life.
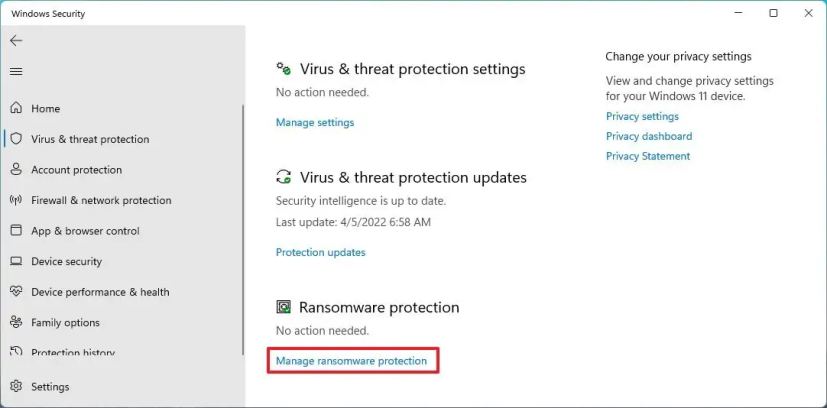
3. Allow ransomware safety
“Managed folder entry” is one other finest safety function constructed into Home windows 11 to guard your pc from ransomware assaults. It does this by monitoring the adjustments that apps make to your recordsdata. If an app tries to change the recordsdata inside a protected folder and the app is blacklisted, you’ll get notified in regards to the suspicious exercise.
To allow the Managed folder entry anti-ransomware safety on Home windows 11, use these steps:
-
Open Home windows Safety.
-
Click on on Virus & risk safety.
-
Click on the “Handle ransomware safety” setting underneath the “Ransomware safety” part.
-
Activate the “Managed folder entry” toggle swap.
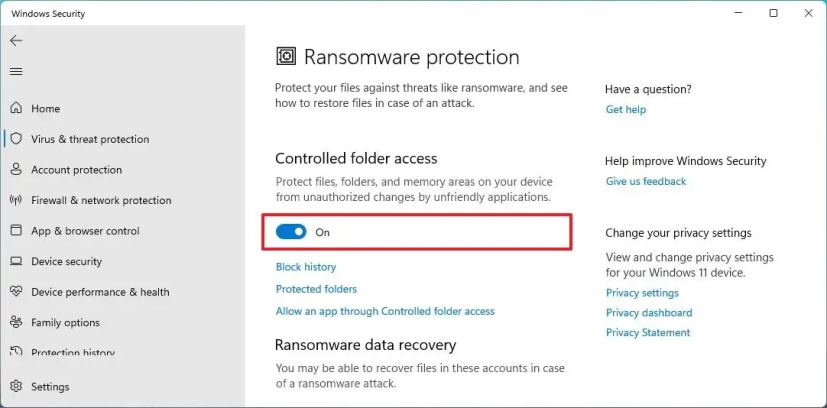
When you full the steps, Microsoft Defender Antivirus will monitor the protected folders as purposes attempt to modify your recordsdata. If suspicious exercise happens, you’ll get a notification in regards to the risk.
Along with enabling the function, it’s half of the equation. You may all the time use these directions to stop the function from blocking trusted purposes and defend folder places apart from the defaults.
4. Allow phishing safety
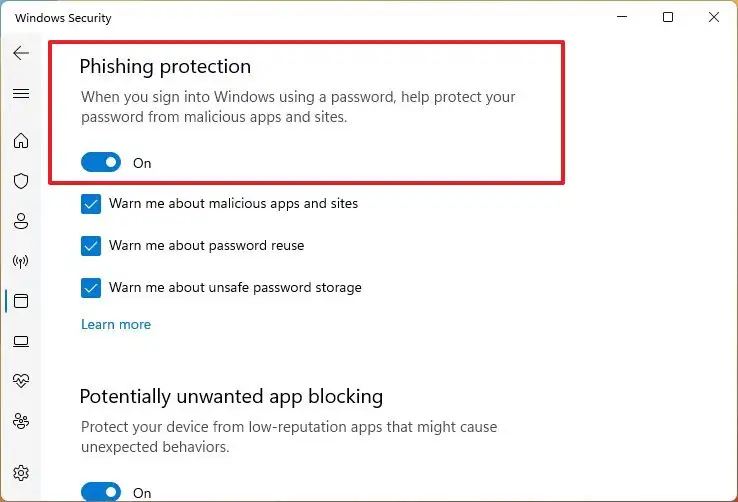
Home windows 11 features a phishing safety function that may defend your passwords from malicious websites and apps. The safety function does this in 3 ways. First, enabling the longer term will present you a warning when it detects you entered your account password on an untrusted website or app. It’ll additionally provide you with a warning when making an attempt to save lots of passwords in plain textual content on an utility and reusing passwords on different accounts because it makes it simpler for hackers to steal your data.
The function works on a Microsoft account, native account, Energetic Listing, or Azure Energetic Listing. Nevertheless, the safety function solely works when utilizing a password, so you need to disable Home windows Hey earlier than enabling phishing safety.
I might solely advocate this function if required or in case you are already not utilizing Home windows Hey. In any other case, you’ll most likely be higher off utilizing passkeys (see directions under).
To allow phishing safety on Home windows 11, use these steps:
-
Open Settings.
-
Click on on Accounts.
-
Click on the Signal-in choices tab.
-
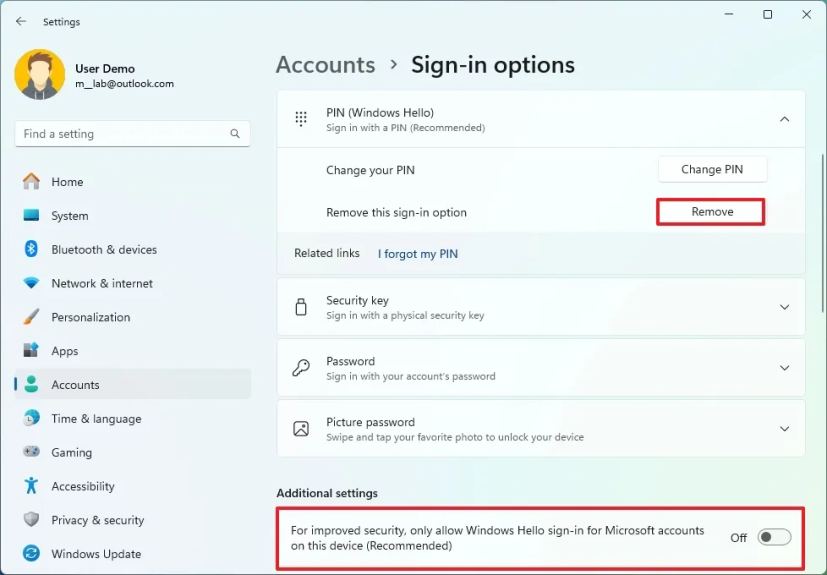
Flip off the “For improved safety, solely permit Home windows Hey sign-in for Microsoft accounts on this system” toggle swap underneath the “Further settings” part.
-
Choose the lively Home windows Hey possibility (facial recognition, fingerprint recognition, or PIN) underneath the “Methods to check in” part.
-
Click on the Take away button.
-
Click on the Take away button once more.
-
Verify your Microsoft account password.
-
Click on the OK button.
-
Open Home windows Safety.
-
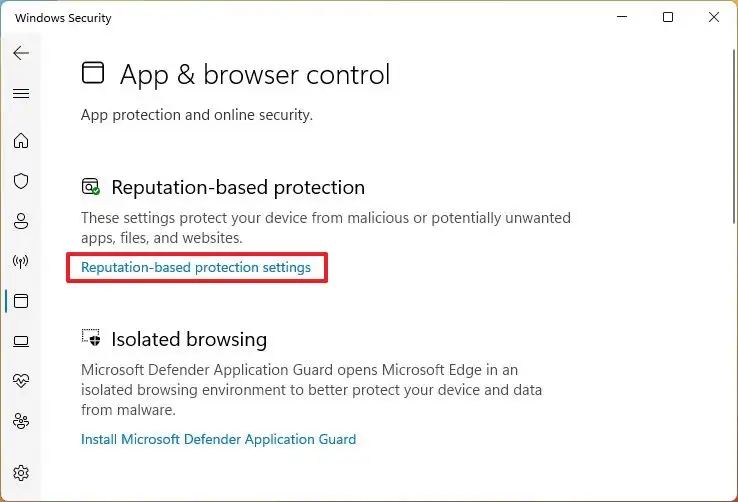
Click on on App & browser management.
-
Click on the “Popularity-based safety settings” possibility.
-
Activate the “Phishing safety” toggle swap to allow the safety function.
-
Test the “Heat me about malicious apps and websites” choice to show a warning when on an untrusted web site or program.
-
Test the “Heat me about password reuse” choice to keep away from utilizing the identical password when creating a brand new account or updating the data on a web site or program.
-
Test the “Heat me about unsafe password storage” choice to warn you to not save a password in plain textual content in a textual content editor.
When you full the steps, the “Enhanced Phishing Safety” function will warn you when coming into a password on an untrusted app or web site with the choice to alter the password to scale back the possibilities of somebody gaining unauthorized entry to your account.
Since textual content editors or Workplace apps weren’t designed to guard your credentials, additionally, you will get a warning when making an attempt to reuse a password or save passwords in these purposes.
5. Create passkeys for web sites and apps
The passkeys function is a safe different to interchange passwords when it’s important to check in to web sites and apps supporting this kind of authentication. The function creates a token for the account you wish to entry, and it’s downloaded on Home windows 11. The subsequent time you wish to entry the net service or app, you can be prompted to enter your Home windows Hey credentials as a substitute of utilizing the password.
In different phrases, a passkey makes an account safer for the reason that password is just not a part of the method, making it more durable for hackers to compromise your account.
Passkey is just not particular to Home windows 11. It’s a safety commonplace that an increasing number of corporations, together with Microsoft, Google, Amazon, Apple, eBay, PayPal, and lots of extra, are implementing into their companies. To create a passkey, you need to examine the service or app account’s settings to ensure the function is accessible.
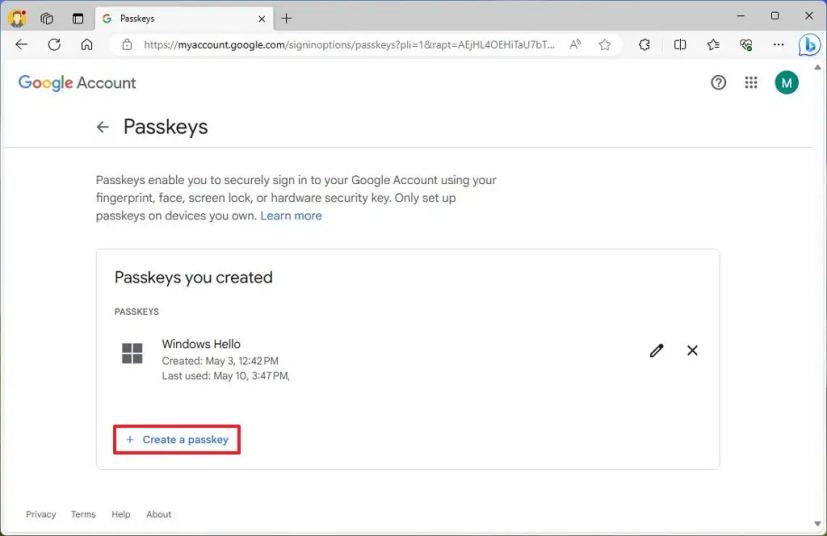
The next instance creates a passkey to your Google account:
-
Open Microsoft Edge (or Google Chrome).
-
Open your Google Account.
-
Check in and open the online service account settings.
-
Activate the “Passkey sign-in” possibility.
-
Click on the “Create a Passkey” possibility.
-
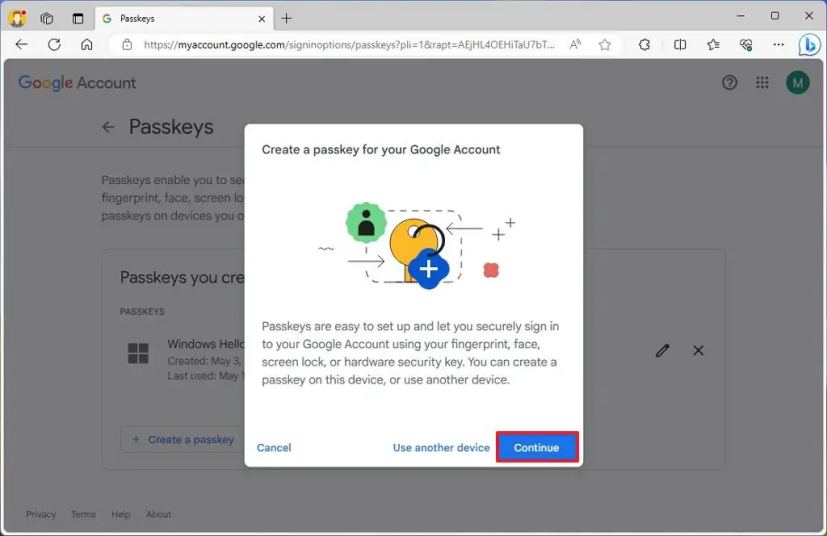
Click on the Proceed button.
-
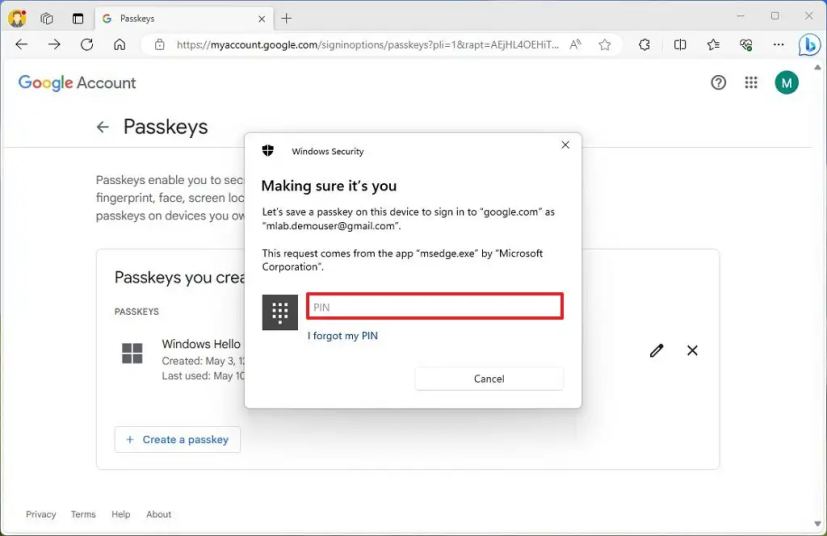
Verify your account credentials on Home windows Hey.
-
Click on the OK button.
-
Click on the Achieved button.
When you full the steps, the passkey might be downloaded as a token in your pc. The subsequent time you wish to entry the service (or app), you should utilize Home windows Hey authentication to finish the sign-in course of as a substitute of utilizing the service password.
The token is barely legitimate per system, which means you need to create a passkey on each system you wish to entry the service. You may view and delete passkeys from Settings > Account > Passkeys.
You may study extra particulars about passkeys on Home windows 11 on this information.
6. Test firewall settings
The Microsoft Defender Firewall can monitor incoming and outgoing community visitors to permit or block connections primarily based on predefined guidelines to guard your pc and data from unauthorized entry. The function must be enabled by default, nevertheless it’s all the time a good suggestion to examine and allow it if it’s not.
To allow the firewall by way of Home windows Safety, use these steps:
-
Open Home windows Safety.
-
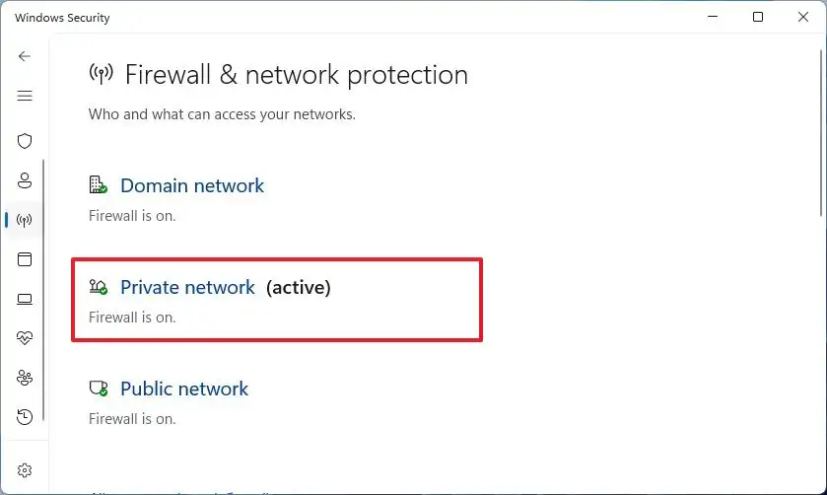
Click on on Firewall & community safety.
-
Click on the lively community possibility.
-
Activate the “Microsoft Defender Firewall” toggle swap to show off the firewall.
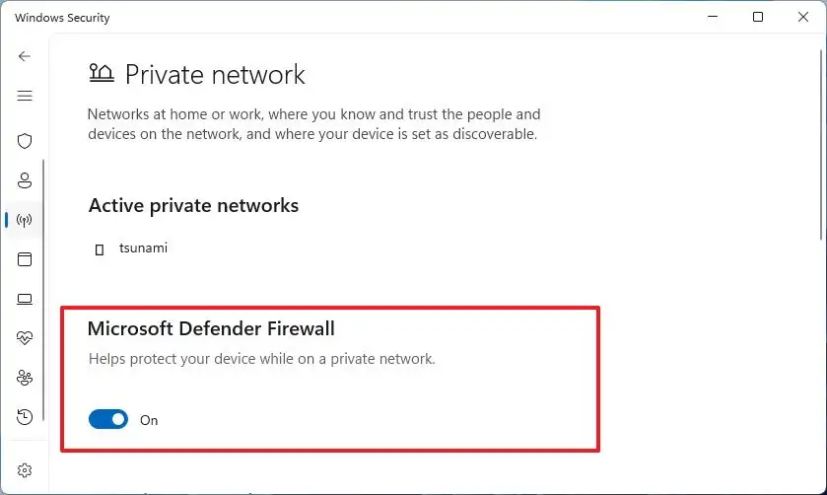
After you full the steps, the firewall will activate for the lively community profile.
7. Allow DNS over HTTPS (DoH)
In order for you an additional layer of safety and privateness when browsing the web, you need to allow DNS over HTTPS (DoH).
DNS over HTTPS is a networking protocol designed to encrypt Area Title System (DNS) queries utilizing the Hypertext Switch Protocol Safe (HTTPS) protocol for privateness and to attenuate assaults from hackers from viewing and manipulating your DNS visitors.
Some purposes like Google Chrome and Mozilla Firefox already help this function, however you may as well configure it on Home windows 11. Right here’s how:
-
Open Settings.
-
Click on on Community & web.
-
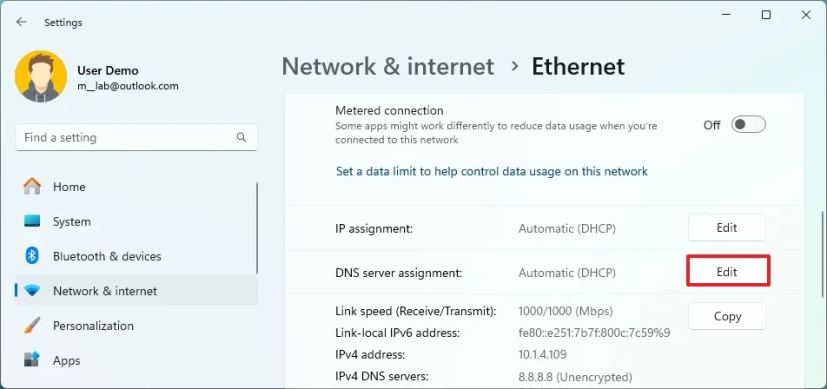
Click on the Ethernet or Wi-Fi tab (relying on the lively connection).
Fast be aware: If in case you have a Wi-Fi connection, click on on the connection properties to entry the settings. -
Click on the Edit button from the “DNS server project” setting.
-
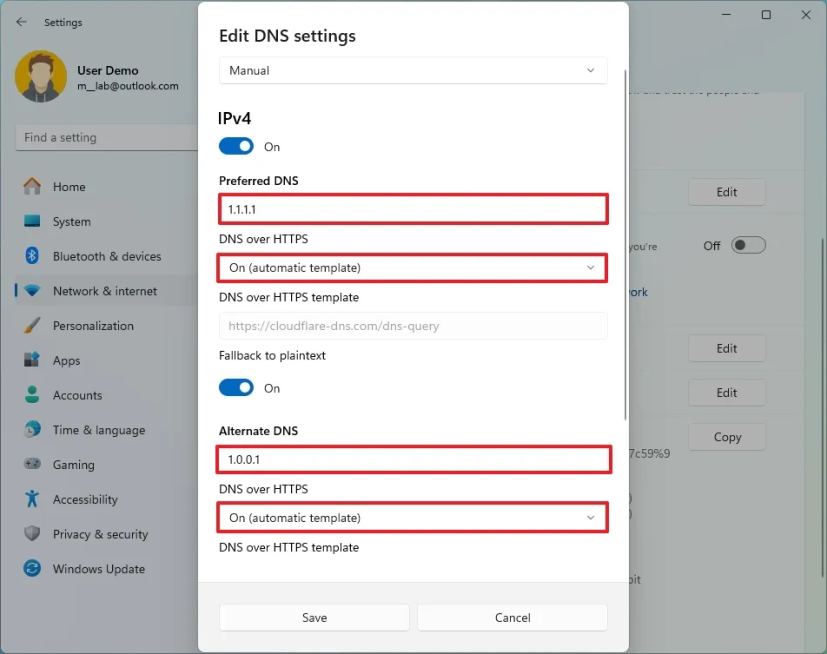
Choose the Handbook possibility from the drop-down menu.
-
Activate the IPv4 toggle swap.
-
Below the “Most well-liked DNS” and “Alternate DNS” sections, specify the first and secondary DoH IP tackle from one of many supported companies. For instance, you should utilize Cloudflare (1.1.1.1 and 1.0.0.1) or Google (8.8.8.8 and eight.8.4.4)
-
Use the “DNS over HTTPS” drop-down menu and choose the On (computerized template) possibility because it sends all DNS visitors with encryption, however you may as well select different encryption preferences.
-
Flip off the “Fallback to plaintext” toggle swap.
Fast tip: In the event you allow this function, the system will encrypt DNS visitors, nevertheless it permits queries to be despatched with out encryption. -
Click on the Save button.
When you full the steps, the pc will encrypt DNS visitors over the HTTPS protocol for a safer and personal expertise.
You may study extra particulars and verify the DoH settings are working with these directions.
8. Allow Home windows Hey Face or fingerprint
As a part of the most effective safety settings for Home windows 11, you may as well use Home windows Hey, which lets you improve your pc’s safety by including biometric components (corresponding to your face or fingerprint) to check in to your profile. In the event you don’t have a tool that integrates some biometric {hardware}, you need to buy a appropriate face recognition digicam or fingerprint reader to set it up.
Allow face recognition authentication
To configure Home windows Hey facial recognition to unlock a pc on Home windows 11, use these steps:
-
Open Settings.
-
Click on on Accounts.
-
Click on the Signal-in choices web page on the correct facet.
-
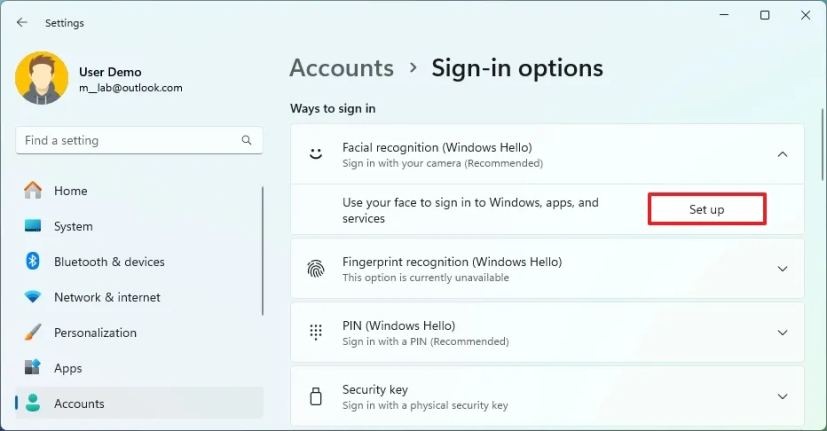
Choose the “Facial recognition (Home windows Hey)” setting underneath the “Methods to check in” part.
-
Click on the Arrange button.
-
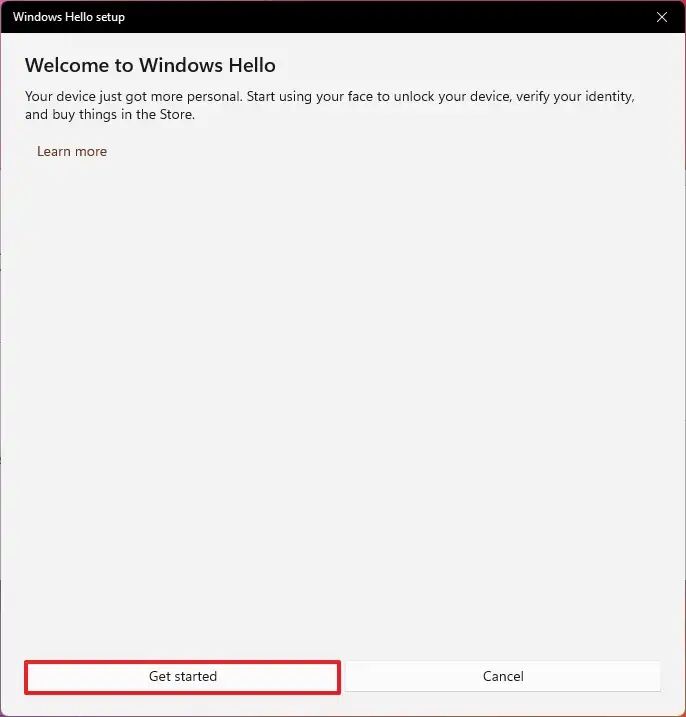
Click on the Get began button.
-
Verify your present password (or PIN).
-
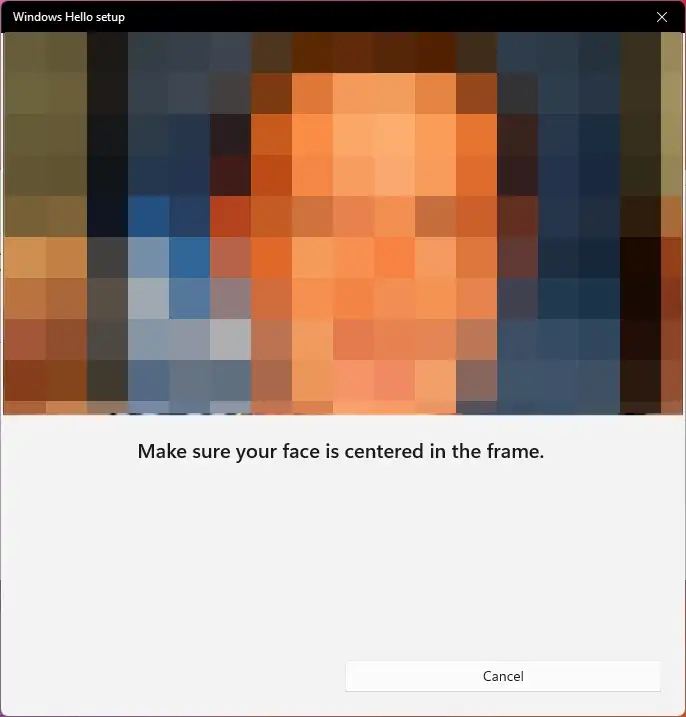
Look straight into the digicam for Home windows 11 to create a facial recognition profile of your face.
-
Click on the Shut button.
When you full the steps, you possibly can lock your pc (Home windows key + L) and look into the digicam to check in.
Allow fingerprint authentication
To arrange Home windows Hey with a fingerprint reader, use these steps:
-
Open Settings.
-
Click on on Accounts.
-
Click on on Signal-in choices.
-
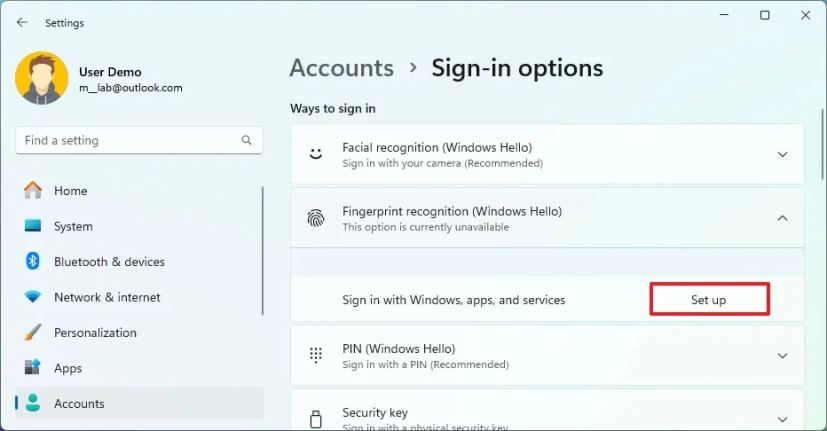
Choose the “Fingerprint recognition” setting underneath the “Methods to check in” part.
-
Click on the Arrange button to allow the Home windows Hey fingerprint possibility.
-
Click on the Get began button.
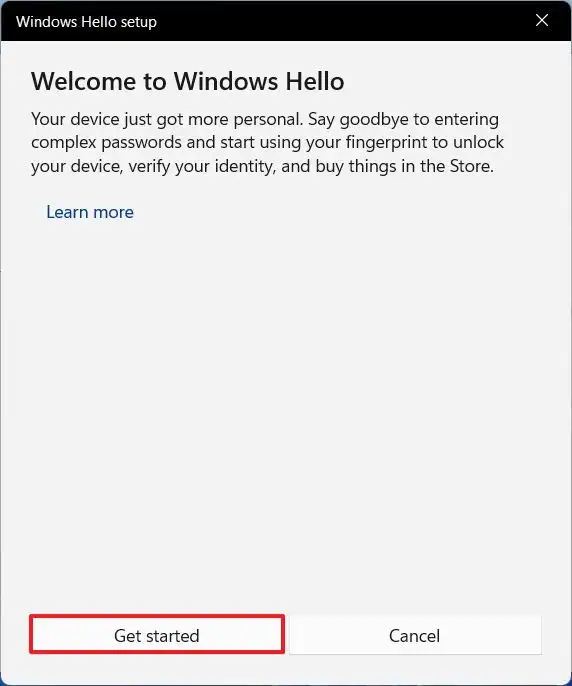
-
Verify your account password.
-
Contact the fingerprint sensor as indicated within the wizard.
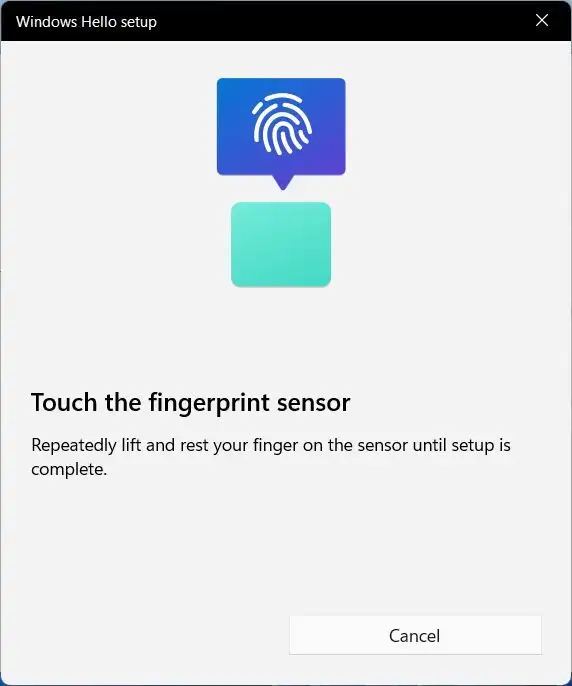
-
Proceed with the on-screen instructions to seize your fingerprint from varied angles.
After finishing the steps, you possibly can lock your system and use the fingerprint reader to check in along with your finger.
9. Allow Dynamic Lock
Dynamic Lock is a safety function constructed into Home windows 11 that locks your pc if you step away primarily based on the proximity of a Bluetooth-paired system (corresponding to your telephone or wearable), including one other layer of safety.
To allow Dynamic Lock on Home windows 11, use these steps:
-
Activate the peripheral.
-
Activate the system’s Bluetooth pair choice to make it discoverable.
-
Open Settings on Home windows 11.
-
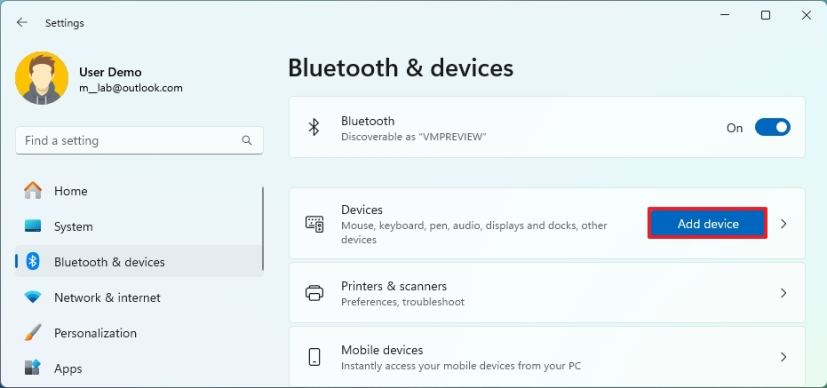
Click on on Bluetooth & gadgets.
-
Activate the Bluetooth toggle swap to allow the wi-fi radio (if relevant).
-
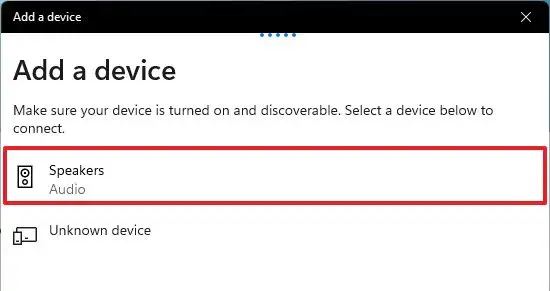
Click on the Add system button.
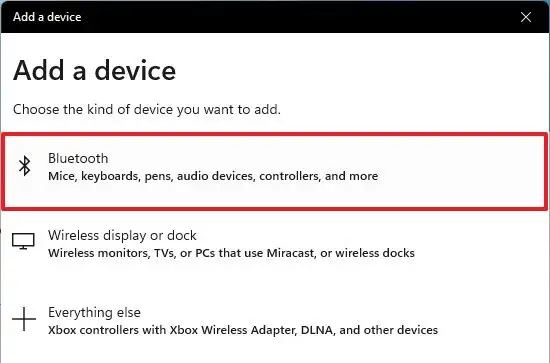
-
Choose the Bluetooth possibility.
-
Select the Bluetooth system from the listing.
-
Proceed with the on-screen instructions (if relevant).
-
Click on on Accounts.
-
Click on the Signal-in choices tab.
-
Choose the Dynamic lock setting.
-
Test the “Enable Home windows to robotically lock your system if you’re away” possibility.
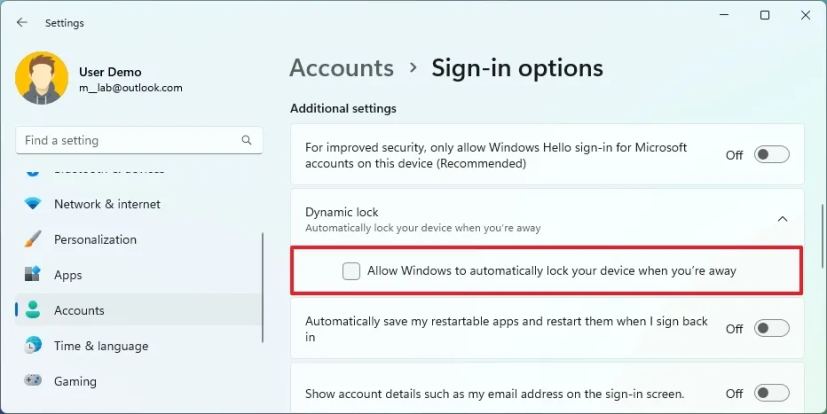
When you full the steps, when the Bluetooth system isn’t close to the pc, Home windows 11 will flip off the display and lock your account after 30 seconds of inactivity.
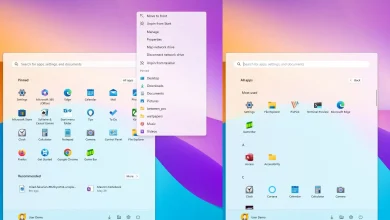
10. Block undesirable apps
Home windows Safety has a function to guard your set up in opposition to malicious apps. The function is called “reputation-based safety,” it might probably detect and block low-reputation apps which will trigger surprising behaviors on Home windows 11, corresponding to poorly designed or dangerous apps.
To allow reputation-based safety to guard Home windows 11 from undesirable apps, use these steps:
-
Open Home windows Safety.
-
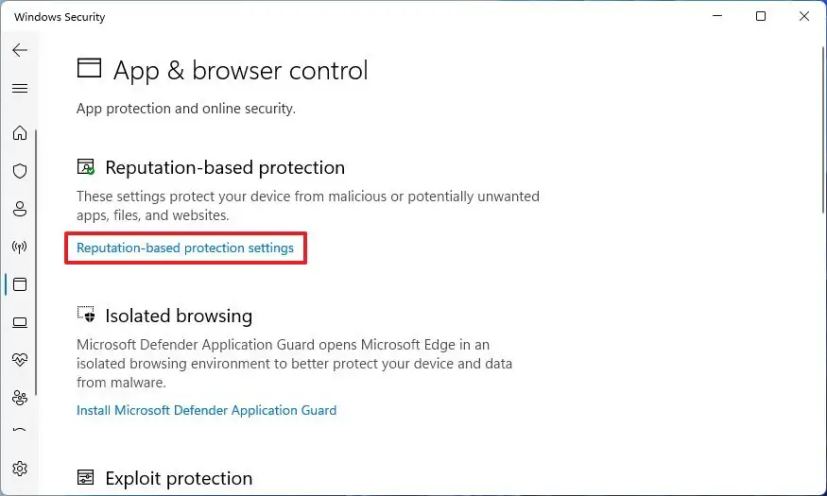
Click on on App & browse management.
-
Click on the “Popularity-based safety settings” possibility underneath the “Popularity-based safety” part.
-
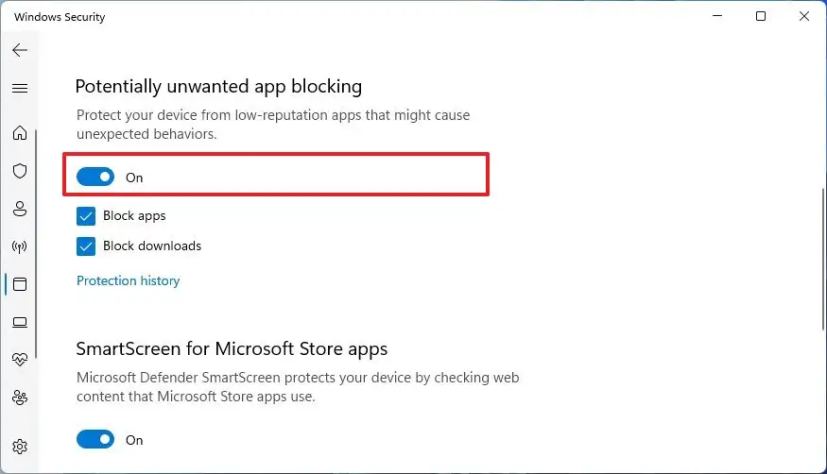
Activate the “Doubtlessly undesirable app blocking” toggle swap.
-
Test the Block apps possibility.
-
Test the Block downloads possibility.
After you full the steps, Home windows 11 can detect and block apps with a low popularity which will trigger issues.
11. Allow encryption
BitLocker is yet one more function on the listing that may be thought of among the best for safety because it lets you use encryption on a drive to guard your information from unauthorized entry to your paperwork, photos, and any information you’ll have on the pc.
The function is barely out there within the Professional, Enterprise, and Schooling editions of Home windows 11. Nevertheless, on Home windows 11 House, you should utilize “system encryption” on some gadgets.
Allow system encryption on Home windows 11 Professional
To configure BitLocker on a Home windows 11 drive, use these steps:
-
Open Settings.
-
Click on on Storage.
-
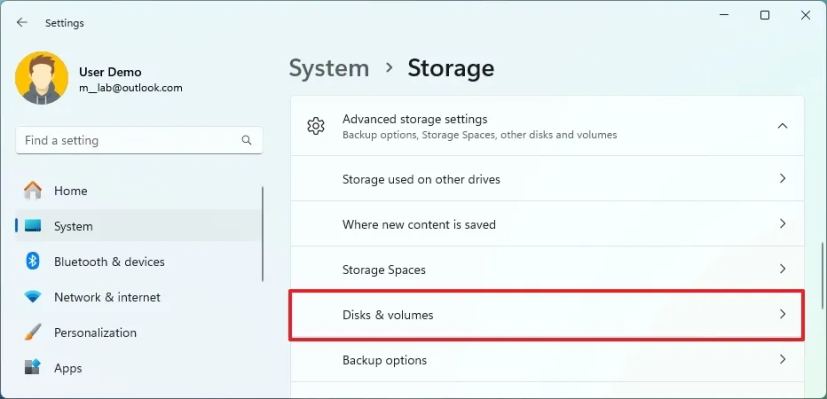
Click on on Superior storage settings underneath the “Storage administration” part.
-
Click on on Disks & volumes.
-
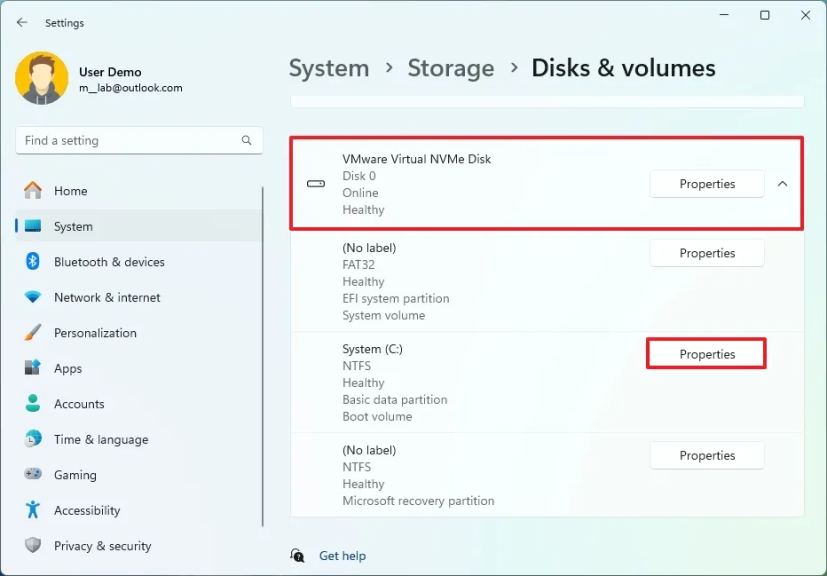
Choose the drive with the quantity to encrypt.
-
Select the quantity to allow BitLocker encryption and click on the Properties button.
-
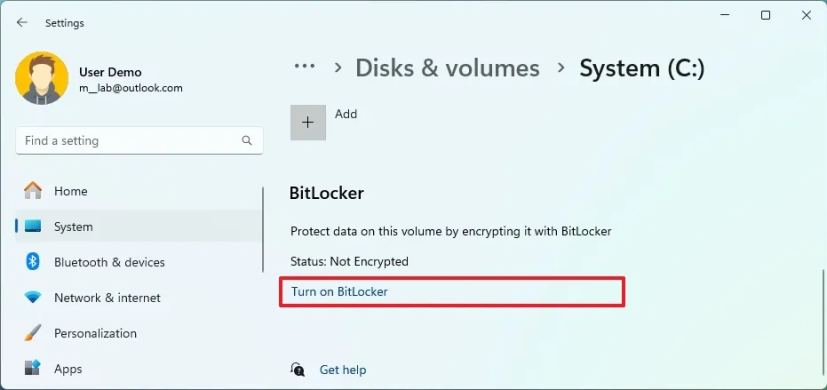
Click on the “Activate BitLocker” possibility.
-
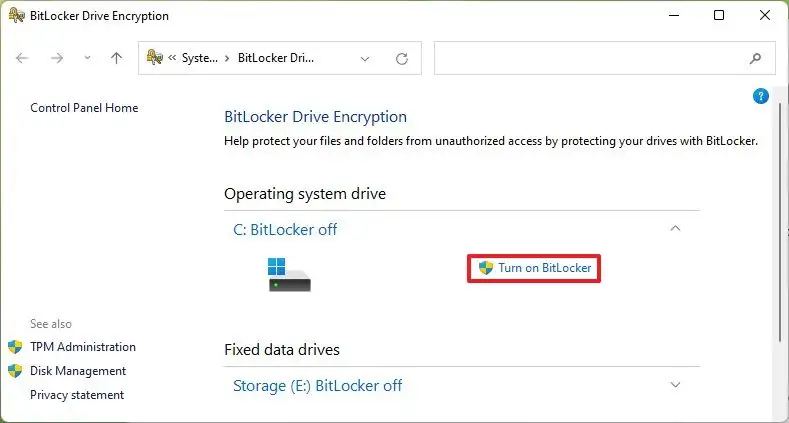
Click on the “Activate BitLocker” possibility underneath the “Working system drive” part.
-
Choose the “Save to your Microsoft account” possibility (beneficial).

-
Click on the Subsequent button.
-
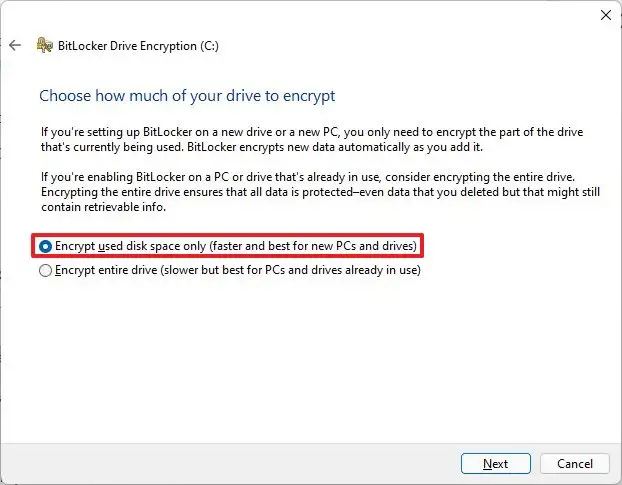
Choose the “Encrypt used disk area solely” possibility.
-
Click on the Subsequent button.
-
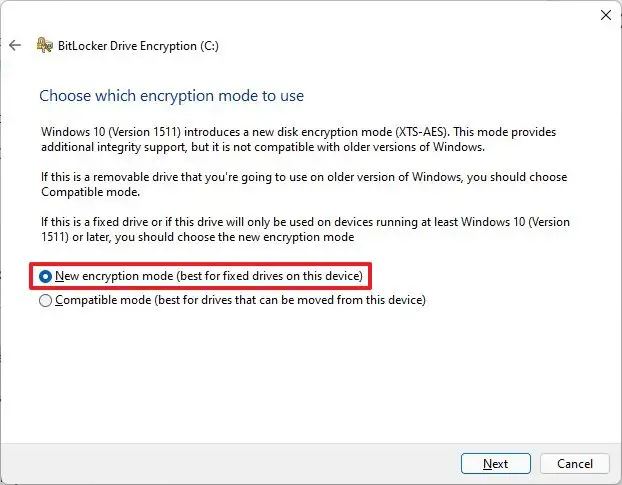
Choose the “New encryption mode” possibility.
-
Click on the Subsequent button.
-
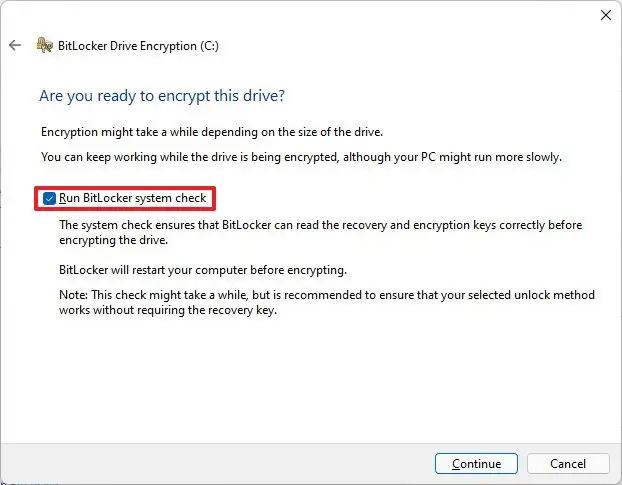
Test the “Run BitLocker system examine” possibility.
-
Click on the Restart now button.
After you full the steps, the pc will restart to use the encryption settings and allow BitLocker.
It’s also possible to allow encryption for secondary and exterior drives. And utilizing BitLocker To Go, you possibly can defend your information on USB flash drives.
Allow system encryption on Home windows 11 House
To configure BitLocker encryption on Home windows 11 House, use these steps:
-
Open Settings.
-
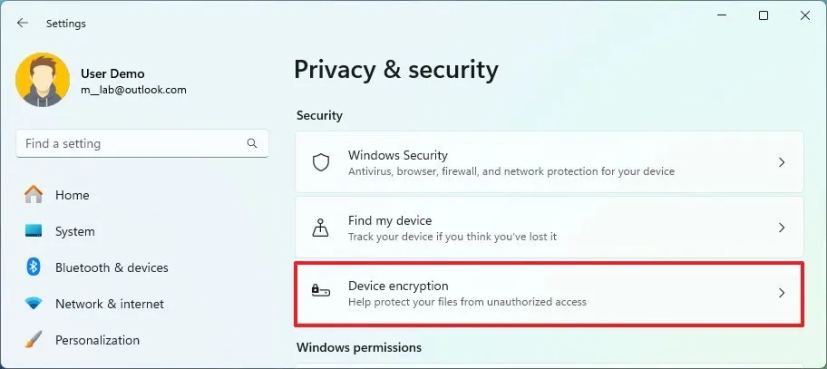
Click on on Privateness & Safety.
-
Click on the Machine encryption web page underneath the “Safety” part.
-
Activate Machine encryption to allow BitLocker on Home windows 11 House.
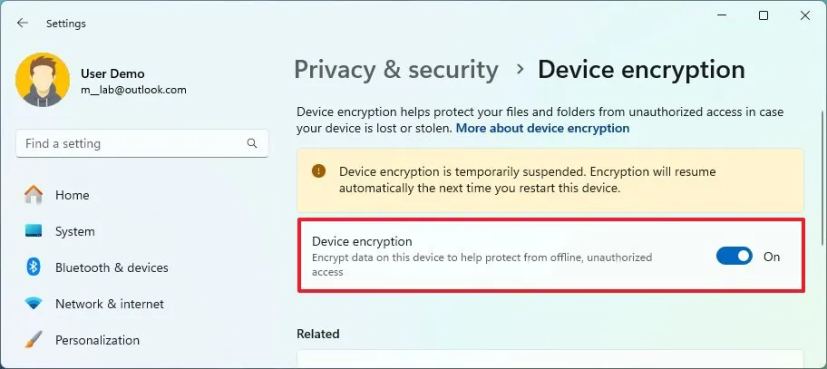
When you full the steps, the function will encrypt the complete system drive.
In the event you now not want encryption, it’s doable to decrypt the drive utilizing the identical directions.
12. Allow Sensible App Management
On Home windows 11, Sensible App Management (SAC) is a safety function that locks the system down, permitting it to run solely trusted apps or apps with legitimate certificates to stop undesirable behaviors from untrusted purposes.
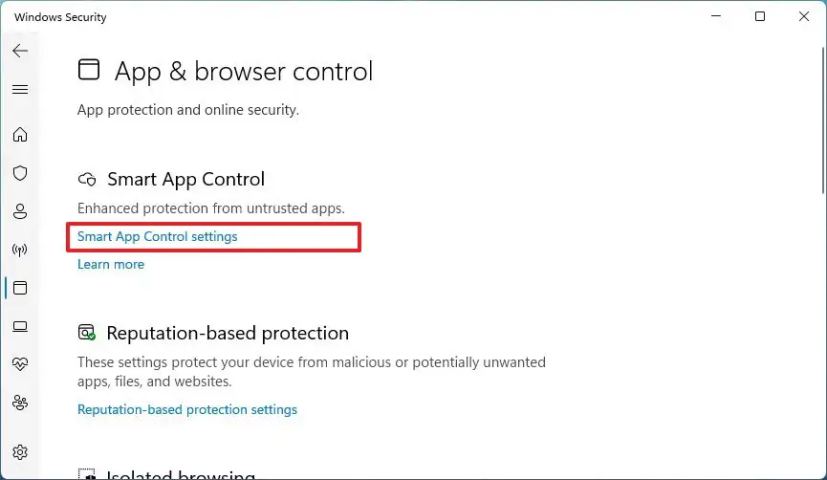
To allow Sensible App Management on Home windows 11, use these steps:
-
Open Home windows Safety.
-
Click on on App & browse management.
-
Click on on Sensible App Management settings.
-
Choose the Analysis possibility.
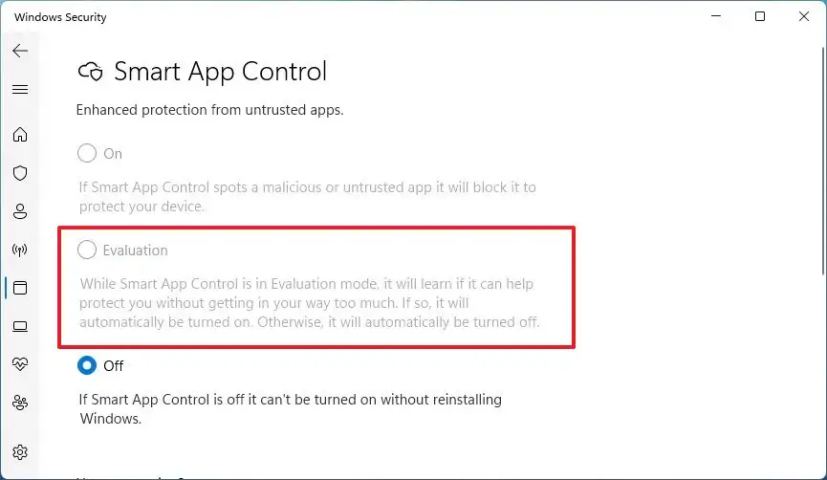
After you full the steps, the function will run quietly within the background however not block something. Nevertheless, on this stage, the system will study out of your purposes to find out whether or not the function can run with out affecting the expertise.
If Sensible App Management can run as anticipated, the system will flip it on robotically. If the function will get in the best way, the system will flip it off robotically.
As soon as the analysis is full, the function will allow robotically, however you received’t be capable to flip it off. Additionally, if the system blocks an app, you received’t be capable to unblock it until you flip off the function, which would require full reinstallation of the working system.
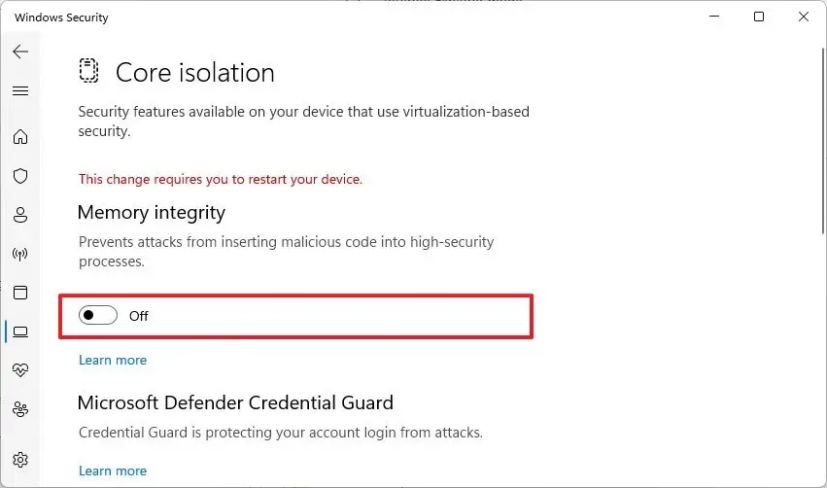
13. Allow Core Isolation
Core Isolation is a set of security measures to guard your pc from malicious code and hackers. One of many options out there is “reminiscence integrity,” which blocks several types of malware from compromising high-security processes in reminiscence.
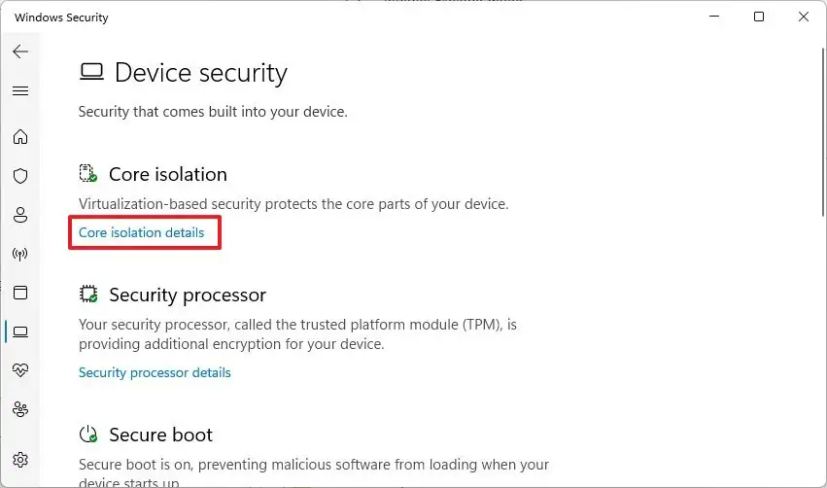
The function must be enabled by default on Home windows 11, but when it’s not, you should utilize these steps:
-
Open Begin.
-
Seek for Home windows Safety and click on the highest consequence to open the app.
-
Click on on Machine Safety.
-
Click on the “Core isolation particulars” possibility underneath the “Core isolation” part.
-
Activate the “Reminiscence integrity” toggle swap to allow the Core isolation.
-
Restart the pc.
When you full the steps, the safety function might be enabled on Home windows 11.
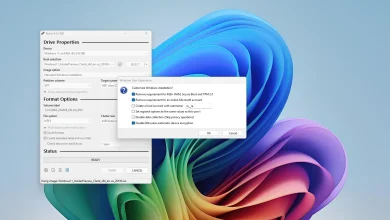
14. Microsoft Defender Utility Guard
Microsoft Defender Utility Guard is a function out there on Home windows 11 that creates a virtualized model of Microsoft Edge so you possibly can browse untrusted web sites with out the danger of malicious code or hackers infecting your pc. This function is barely out there on Home windows 11 Professional, not within the House version.
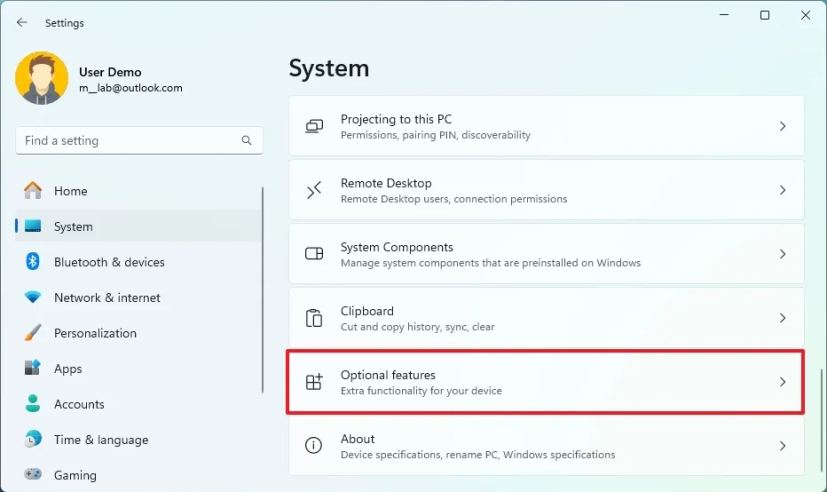
To allow Microsoft Defender Utility Guard on Home windows 11, use these steps:
-
Open Settings.
-
Click on on System.
-
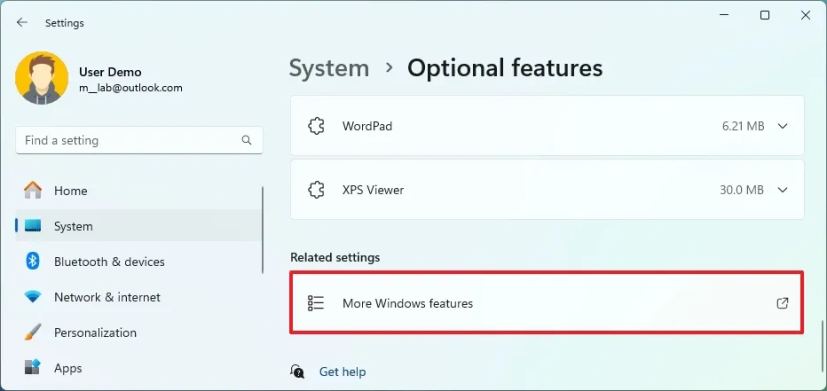
Click on the Elective options web page.
-
Click on the “Extra Home windows options” setting underneath the “Associated settings” part.
-
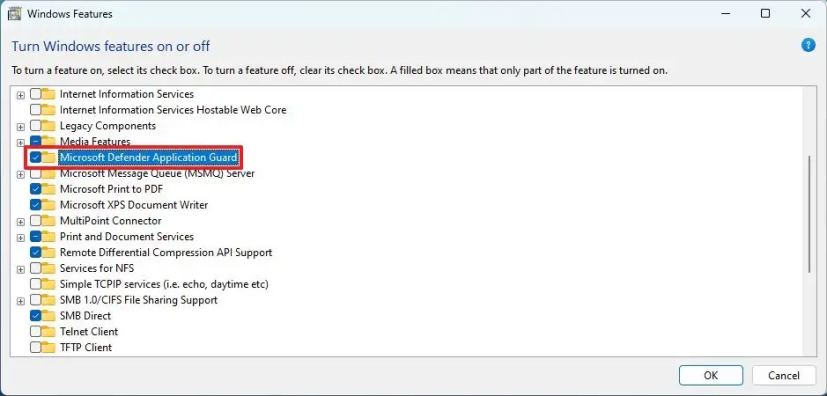
Test the “Microsoft Defender Utility Guard” possibility.
-
Click on the OK button.
-
Click on the Restart now button.
After finishing the steps, you possibly can open Microsoft Edge, click on the “Settings and extra” (three-dotted) menu within the top-right nook, and choose the “New Utility Guard window” possibility. As soon as the session begins, you possibly can browse the untrusted web site with out compromising your setup.
While you shut the session, the virtualization might be deleted from the pc with out saving something.
15. Home windows Sandbox
Home windows Sandbox is just like the Microsoft Defender Utility Guard function. Nevertheless, the Sandbox function offers a full desktop virtualization expertise to put in and check untrusted purposes remoted from the primary set up.
To allow Home windows Sandbox on Home windows 11, use these steps:
-
Open Settings.
-
Click on on System.
-
Click on the Elective options web page.
-
Click on the “Extra Home windows options” setting underneath the “Associated settings” part.
-
Test the Home windows Sandbox possibility.
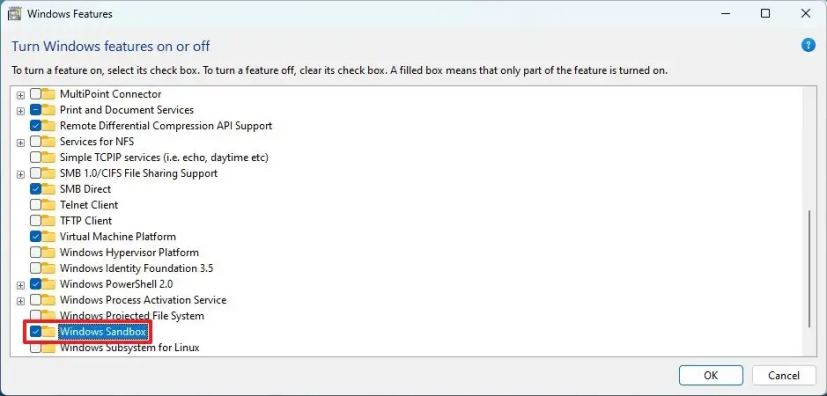
-
Click on the OK button.
-
Click on the Restart now button.
When you full the steps, you possibly can run Home windows Sandbox from the Begin menu.
If it’s important to set up an utility, you possibly can obtain the installer from the web utilizing the browser out there on the digital machine or from the primary set up, reduce and paste the file on the Home windows Sandbox desktop, after which set up it on the remoted surroundings.
16. Full backup
On Home windows 11, a full backup is without doubt one of the finest safety practices to create a duplicate of the complete system. This lets you recuperate in case of vital system issues, malware assaults like ransomware, {hardware} failure, or upgrading the first drive. As well as, a backup may also help you roll again to a earlier set up after upgrading to a brand new function replace or exhausting drive.
You may all the time select a third-party answer, however you possibly can nonetheless use the (deprecated) legacy “System Picture Backup” software to save lots of a full backup to a USB exhausting drive.
To create a full backup on Home windows 11, use these steps:
-
Open Begin.
-
Seek for Management Panel and click on the highest consequence to open the app.
-
Click on on System and Safety.
-
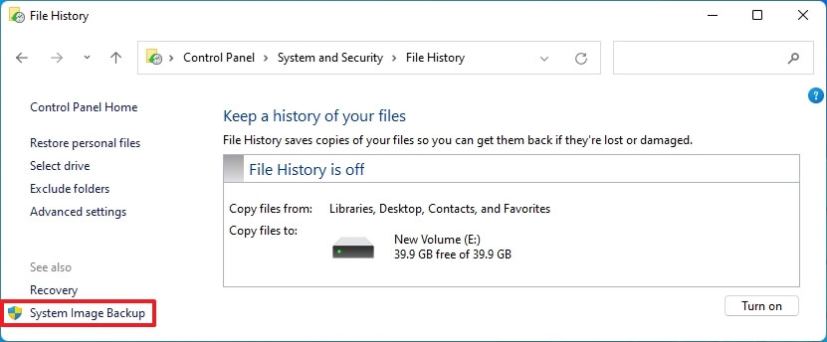
Click on on File Historical past.
-
Click on the “System Picture Backup” possibility from the left pane.
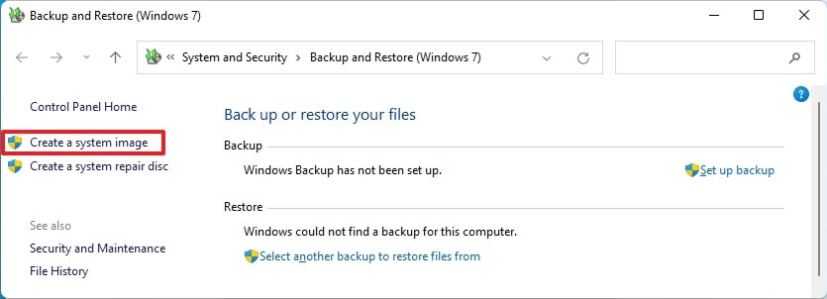
-
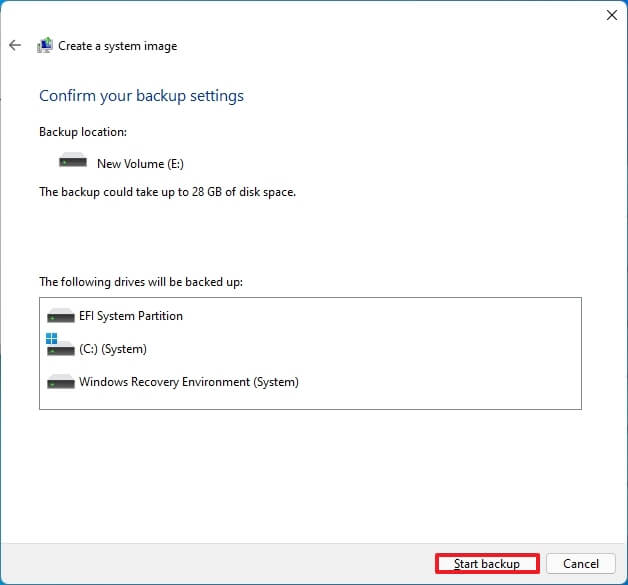
Click on the “Create a system picture” possibility from the left pane.
-
Choose the exterior drive to save lots of the Home windows 11 backup.
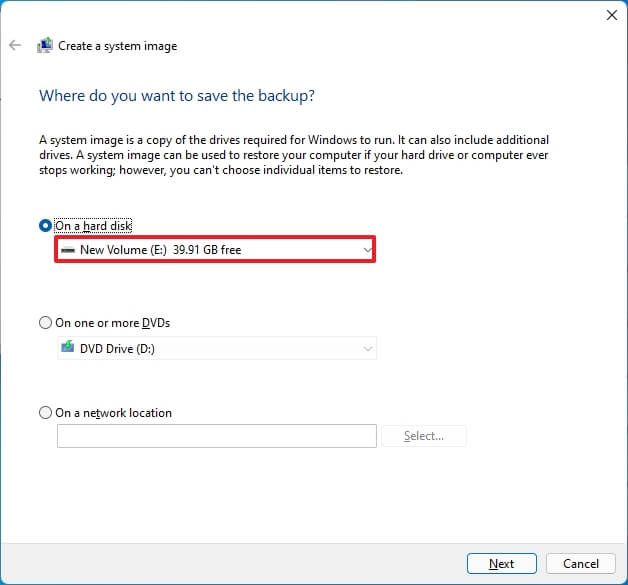
-
Click on the Subsequent button.
-
Click on the Begin backup button.
-
Click on the No button.
-
Click on the Shut button.
When you full the steps, Home windows 11 will create a full pc backup.
Additionally, you will obtain the choice to create a restore disk, however you possibly can ignore it since you should utilize the Home windows 11 bootable media to entry the restoration settings to revive the backup.
Along with periodically backing up your system, it’s beneficial that you simply retailer your recordsdata within the cloud utilizing third-party companies like OneDrive. This strategy will defend the recordsdata from {hardware} failure, ransomware, or theft.
Alternatively, copying your recordsdata to an exterior drive with a easy copy and paste (so long as you don’t have a number of information) is one other option to defend your paperwork, photos, movies, and different recordsdata.
17. Swap from Administrator to Commonplace Consumer account
Home windows 11 presents two forms of accounts (“Administrator” and “Commonplace Consumer”) with completely different permission ranges to handle the system and apps. The Administrator account has limitless entry and permits customers to alter system settings, run elevated duties, and carry out just about any process.
The Commonplace Consumer account presents a extra restrictive surroundings. A person with this privilege stage can work with apps however can not set up apps. They will additionally change settings, not system settings or settings for different customers.
Since utilizing an account with out limits generally is a safety threat, switching to a normal account is without doubt one of the finest practices to enhance safety. You may create a brand new “Administrator” account just for administration and alter your account kind to “Commonplace Consumer.”
Create native administrator account
To create an administrator native account by way of the Settings app, use these steps:
-
Open Begin.
-
Seek for Settings and click on the highest consequence to open the app.
-
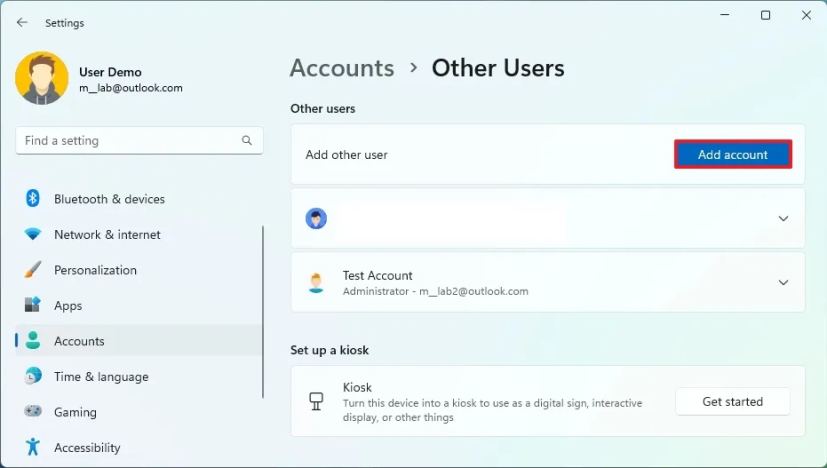
Click on on Accounts.
-
Click on the Different customers web page.
-
Click on the Add account button underneath the “Different customers” part.
-
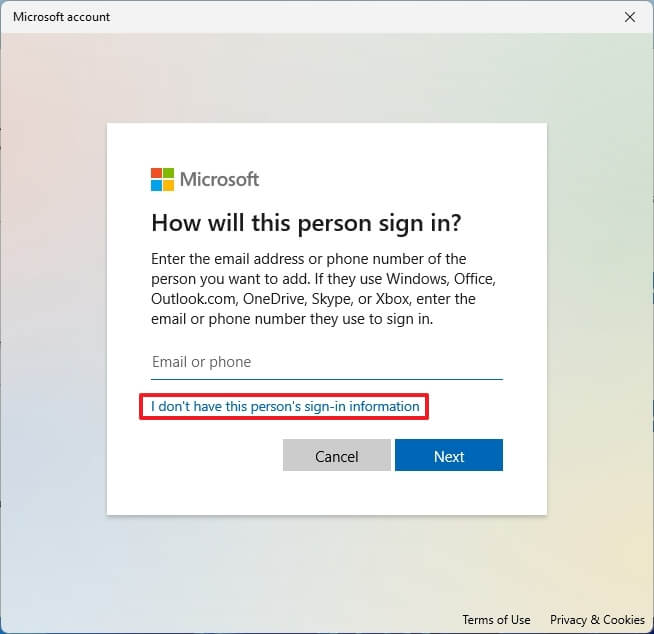
Click on the “I don’t have this individual’s sign-in data” possibility.
-
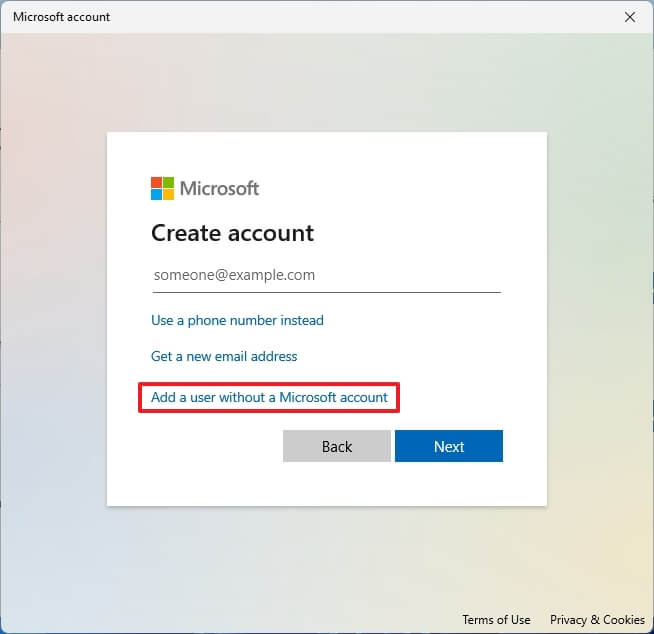
Click on the “Add a person and not using a Microsoft account” possibility.
-
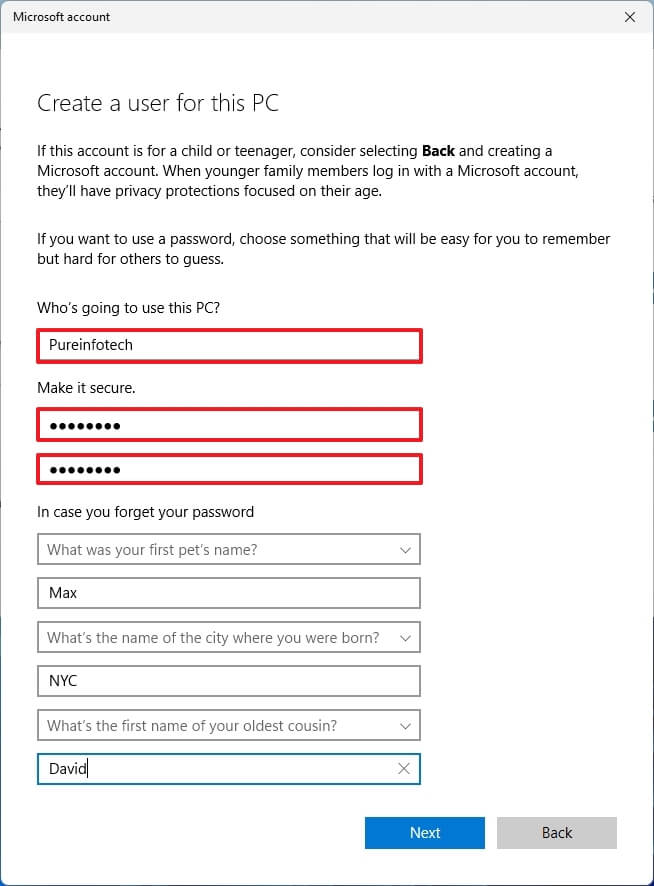
Create an administrator account by confirming a reputation and password.
-
Create safety questions and solutions to recuperate the account if the password is misplaced.
-
Click on the Subsequent button.
-
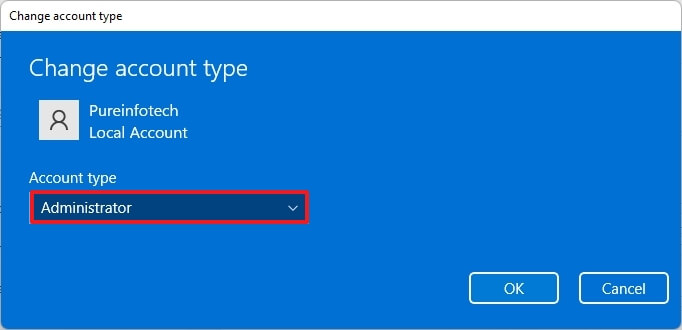
Choose the newly created account and click on the “Change account kind” button.

-
Choose the Administrator possibility from the “Account kind” setting.
-
Click on the OK button.
When you full the steps, the brand new account will seem on Home windows 11.
Swap to plain account
To alter an “Administrator” account to a “Commonplace Customers” account on Home windows 11, use these steps:
-
Signal out of your present account.
-
Check in to the newly created administrator account.
-
Open Settings.
-
Click on on Accounts.
-
Click on the Different customers web page.
-
Choose the first account.
-
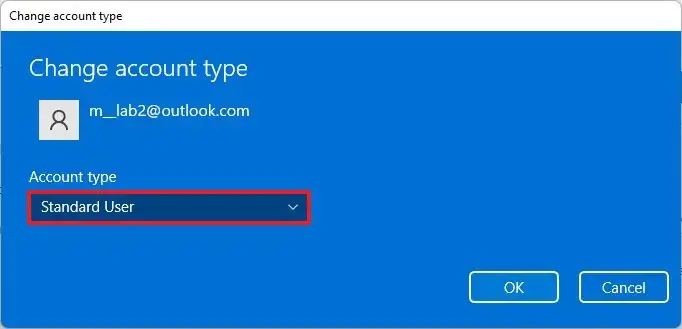
Click on the “Change account kind” button.
-
Choose the Commonplace Consumer possibility from the “Account kind” setting.
-
Click on the OK button.
After finishing the steps, the unique account will swap from “Administrator” to “Commonplace Consumer” account kind. You’ll be prompted to verify the administrator credential to make system adjustments or set up new apps. You may nonetheless check in to the administrator account to carry out system adjustments.
18. Disable Distant Desktop
Though the Distant Desktop function lets you entry recordsdata and purposes from one other location or supply help with out being current on the website, it additionally presents a safety threat as it might assist a malicious particular person acquire unauthorized entry to the pc. As a finest safety follow, flip off the function should you don’t use it.
To disable Distant Desktop on Home windows 11, use these steps:
-
Open Settings.
-
Click on on System.
-
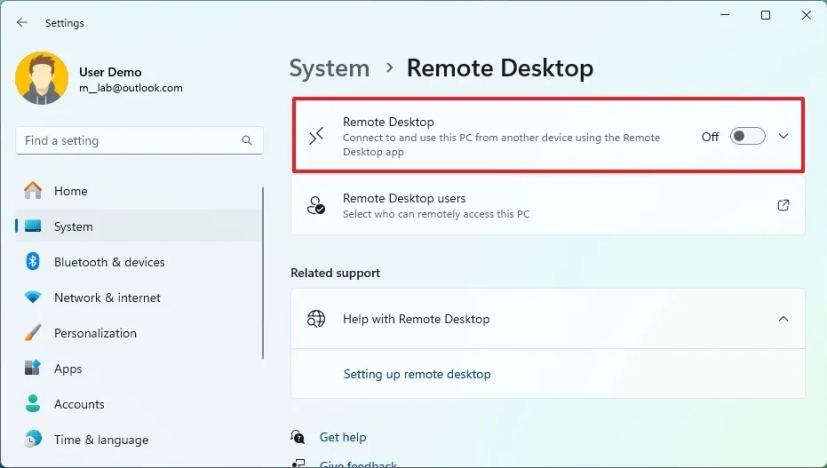
Click on on Distant Desktop.
-
Flip off the Distant Desktop toggle swap.
-
Click on the Verify button.
When you full the steps, malicious people shouldn’t be capable to exploit the RDP protocol to achieve unauthorized entry to your pc.
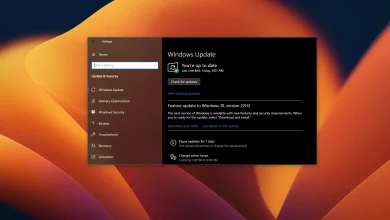
19. Sync time and date
On Home windows 11, it’s additionally vital to maintain the system with the right time and date. In any other case, it might trigger safety issues, corresponding to making an attempt to check in to a service or utility on the community or web.
To replace the time and date on Home windows 11, use these steps:
-
Open Settings.
-
Click on on Time & language.
-
Click on the Date & time web page.
-
Activate the “Set time robotically” toggle swap.
-
Click on the Sync now button underneath the “Further settings” part.
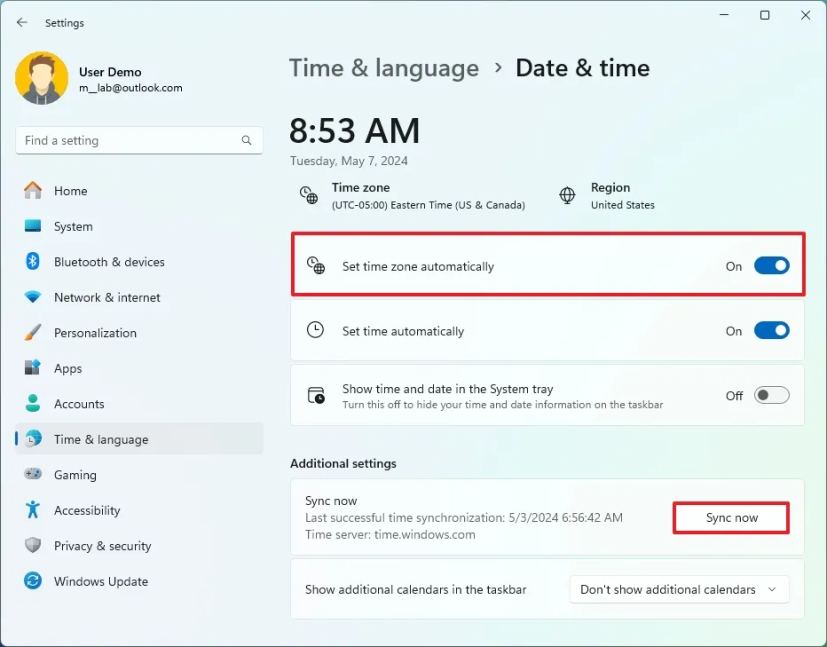
After you full the steps, Home windows 11 will replace and present the right time on the pc.
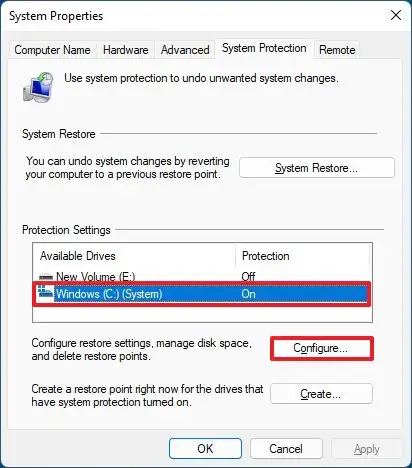
20. Create system restore level
System Restore lets you create a duplicate of the system state as a “restore level” to guard the exhausting drive’s information if one thing goes fallacious after an replace, when putting in an utility, or when making system adjustments. The function robotically creates a restore level when it detects system adjustments (corresponding to putting in a brand new replace or driver), however you possibly can all the time make a restore level manually.
To create a restore level on Home windows 11, use these steps:
-
Open Begin on Home windows 11.
-
Seek for Create a restore level and click on the highest consequence to open the app.
-
Choose the system drive (C) and click on the Configure button underneath the “Safety Settings” part.
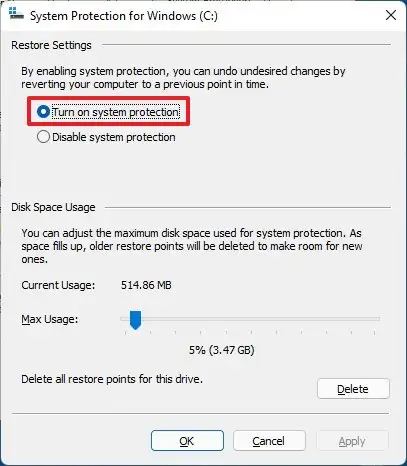
-
Choose the “Activate system safety” possibility.
-
Click on the Apply button.
-
Click on the OK button.
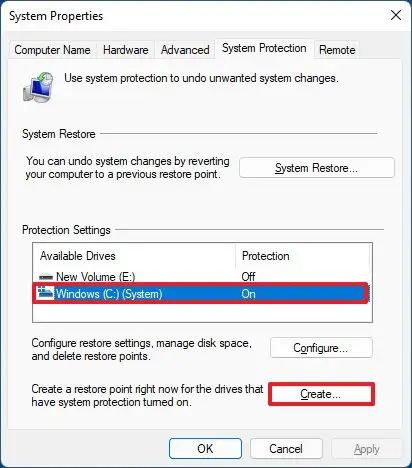
-
Click on the Create button to create a restore level on Home windows 11.
-
Verify a reputation for the restore level.
-
Click on the Create button.
-
Click on the Shut button.
When you full the steps, the system will create a restore level that features system recordsdata, put in purposes, system settings, and a backup of the Registry.
It’s also possible to comply with these directions to revive the system utilizing a restore level. Chances are you’ll must relaxation the system if the restoration doesn’t work.
What safety settings are you altering on Home windows 11? Let me know within the feedback.
Replace Might 7, 2024: This information has been up to date to make sure accuracy and replicate adjustments to the method.