Did you encounter an replace error 0x8007371c whereas updating Home windows 10 its subsequent obtainable Construct model? Nicely, this error code normally happens as a result of corruption throughout the Home windows Parts or Companies. On this submit, now we have introduced up six working ways in which might assist you to to resolve this update-related challenge in Home windows.
What do you get when an error 0x8007371c happens?
The replace error 0x8007371c typically accompanies an error message that claims both of the next –
ERROR_SMI_PRIMITIVE_INSTALLER_FAILEDThe SMI primitive installer failed throughout setup or servicing
That is fairly clear within the error message itself is that both the servicing stack replace is failing to put in, or some required drivers weren’t operating in your laptop. Let’s study subsequent tips on how to clear up this replace challenge in Home windows –
Home windows 10 Replace Error 0x8007371c Options
To unravel the 0x8007371c error on Home windows 10 PC, attempt the beneath workarounds. There is no such thing as a have to observe the options in sequential order, nevertheless doing so might go for that chance.
1] Restart Home windows and Verify for Updates
Earlier than continuing to the precise options, we suggest correctly restarting your PC as soon as. That is important as many a time we merely don’t know the way lengthy we haven’t rebooted our system. When the Home windows 10 reloads, go to Settings > Replace & Safety > Home windows Replace, and hit Verify for Updates.
In case you continue to obtain this bug, attempt the beneath recommendations –
2] Run Home windows Replace Troubleshooter
Home windows Replace Troubleshooter is an inbuilt instrument by Microsoft to seek out and resolve completely different update-related bugs and errors. So, you have to use this utility program to eliminate the 0x8007371c challenge. Right here’s tips on how to use this –
- Use Win + I to launch the Settings app and select to “Replace & Safety“.
- Click on the Troubleshoot choice obtainable on the left pane.
- On the correct pane, hit the “Further troubleshooter” hyperlink.
- Subsequent, click on Home windows Replace and press the “Run the troubleshooter” button.
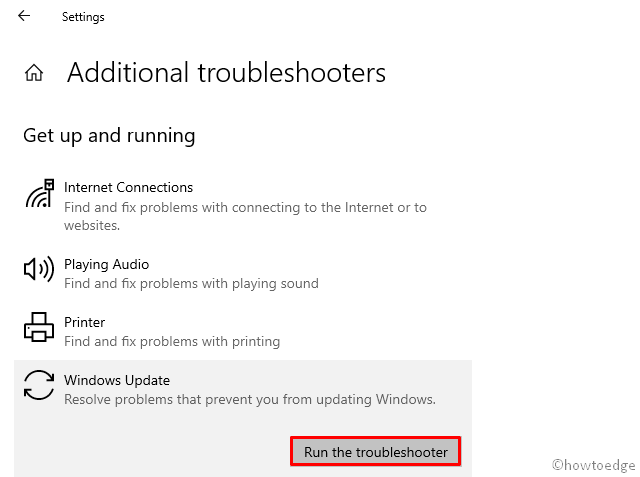
- This instrument then instantly begins searching for doable corrupt recordsdata and repairs them as nicely.
- As soon as this completes the restore course of, Restart your Home windows once more.
3] Rename SoftwareDistribution and Catroot2 Folders
If the Troubleshooter doesn’t resolve the error 0x8007371c, Home windows Parts will need to have change into corrupt by some means. To repair this, you have to clear the momentary recordsdata which might be saved contained in the Software program Distribution and Catroot2 folders.
After clearing its contents, try and test for Updates once more. You could discover the above two folders at these areas – C:Home windows and C:WindowsSystem32.
In case the Replace error 0x8007371c remains to be unresolved, attempt renaming these two folders. You received’t have the ability to rename these folders identical to regular folders as they’re an integral a part of the Home windows Working System. Therefore, observe these straightforward steps to rename them –
- To begin with, open Command Immediate with admin rights.
- Run these codes on the console one after the other, doing so will cease among the important providers.
- Don’t overlook to press the Enter key after every command –
internet cease wuauserv
internet cease cryptSvc
internet cease bits
internet cease msiserver
- Copy/paste these two codes individually adopted by the Enter key –
ren C:WindowsSoftwareDistribution SoftwareDistribution.previous
ren C:WindowsSystem32catroot2 Catroot2.previous
- Restart the providers that you simply stopped earlier by operating the beneath codes –
internet begin wuauserv
internet begin cryptSvc
internet begin bits
internet begin msiserver
The Replace error 0x8007371c will need to have been resolved by now. If not, attempt the following set of workarounds –
4] Manually obtain and set up Standalone Package deal
If not one of the fixes above resolve the error, manually putting in the current patch ought to repair the 0x8007371c error. Nonetheless, you have to know the newest safety patches to your present Home windows 10 model. You could search for failed updates underneath “View Updates Historical past” on the Home windows Replace web page. For simplicity, now we have compiled an inventory of current Home windows 10 Cumulative Updates.
After you have the related KB quantity to seek for, use the beneath guideline to obtain and set up it in your system –
- To begin with, open the Microsoft Update Catalog.
- Paste the KB quantity famous down above and hit Enter. A listing of matching outcomes pop-up.
- Hit the Obtain button subsequent to the system structure to which your PC at present belongs.
- Click on the high hyperlink and the .msu file will begin downloading instantly afterward.
As soon as the setup file will get downloaded, browse to the Obtain folder and double-click on the setup file. Your system will quickly start upgrading to the chosen OS Construct.
5] Boot into Protected Mode and carry out Home windows Replace
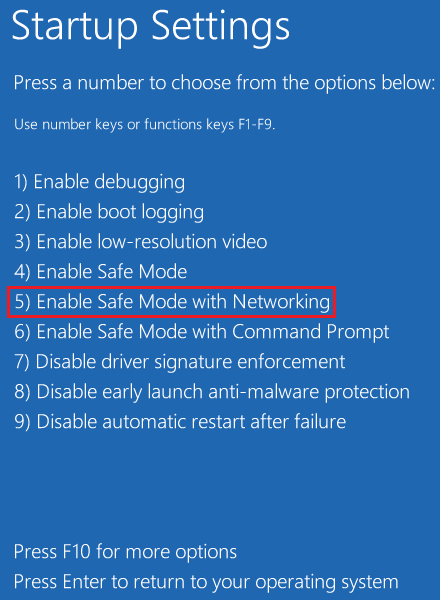
The above methodology works for nearly all instances. Nonetheless, in case you are nonetheless receiving the 0x8007371c error, there’s a third-party affect stopping the Home windows Replace to happen usually. To unravel this, you might boot into Protected Mode with Networking. Doing so will devoid any third-party purposes from interfering with system recordsdata. Right here’s tips on how to carry out Clear Boot on Home windows PC –
- Navigate to the beneath path –
Settings (Win+I) > Replace & Safety > Restoration
- On the adjoining proper, find and click on “Restart Now” underneath Superior Startup.
- When Home windows 10 reboots, browse to the next location –
Select an choice > Troubleshoot > Superior Choices > Startup Settings > Protected Mode with Networking
|
Alternate Solution to Enter Protected Mode Open the System Configuration window, change to the Boot tab, and choose “Protected Boot” underneath Boot choices. Do test the “Minimal” checkbox earlier than clicking the OK button.
|
Use System Backup or Clear Set up
For those who had created system backups on the pc, it’s the correct time to revert again OS to a state the place every part was operating usually. Discover ways to use system restore factors in case you could have created one prior to now. If not, learn on tips on how to carry out a clear set up of Home windows.