You might be right here as a result of your Realtek sound card has given you an error 0xC0000374 when attempting to put in some vital drivers. This drawback typically happens with an error message that appears much like Set up Realtek HD Audio Driver Failure, Error 0xC0000374.
Should you always expertise a Realtek Excessive Definition Audio error, it could be time to take motion. This drawback is widespread for many who have a pc with Home windows 10 and have upgraded from Home windows 8 or Home windows 7.
What Causes Realtek HD Audio Driver Failure
Many alternative causes might end result on this sound/audio error. Nevertheless, in some instances, this situation may be brought on by a useless sound card. On this case, there isn’t a software program answer that may be capable to repair the issue. The one choice is to exchange the sound card.
Associated: Realtek Excessive Definition Audio Concern on Home windows 10
Repair Realtek Excessive Definition Audio Error 0xC0000374
This drawback normally occurs due to the Realtek HD Audio driver system crashes and errors. It’s simply solved, however it may possibly turn into irritating particularly if it is advisable repair it on the go.
Earlier than you attempt the options, right here are some things it is advisable know –
- Those that have been unfortunate sufficient to improve their computer systems to the newest model and shortly skilled the Realtek audio error would want to replace their drivers manually.
- If the motive force doesn’t repair the issue, then one may additionally attempt reinstalling the sound card driver from the producer’s web site.
- One different factor which may assistance is uninstalling after which re-installing the motive force updates.
To repair Realtek Excessive Definition Audio Error 0xC0000374, use the next strategies –
- Reinstall Realtek HD Audio Manager
- Deactivate Microsoft UAA Bus Driver
- Update Realtek driver using Device Manager
- Add Legacy hardware
1. Reinstall Realtek HD Audio Supervisor
Evidently your system has been compromised by a tainted driver that precipitated this error. To repair this error, uninstall the Realtek HD Audio Supervisor and set up it once more. Earlier than you obtain the brand new driver, you need to test the motive force model and take away the duplicate audio drivers to keep away from conflicting variations.
- Open the Begin menu and seek for the System Supervisor.
- Then choose the end result from the highest of the record.
- Now scroll down and broaden Sound, video, and recreation controllers from the record in System Supervisor.
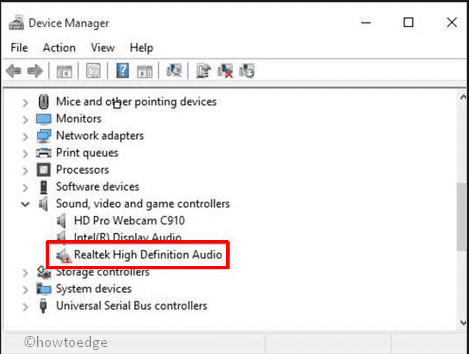
- Proper-click on the Realtek Excessive Definition Audio audio driver.
- Choose Uninstall system from the menu record.
- Then test to Delete the motive force software program for this system and click on the Uninstall button.
- Change to the View tab and click on on Present Hidden Units from the choice record.
- Comply with the on-screen directions to finish the process.
- Discover out if there are duplicate audio drivers. Proper-click on it and choose Uninstall.
After you full the above course of, restart your laptop to use the modifications.
Then navigate to the Realtek HD Audio Manager official page and obtain it. After that, click on on the executable file to start out its set up.
2. Deactivate Microsoft UAA Bus Driver
Additional, we suspect the UAA driver will also be the primary perpetrator behind this situation. Because of this, the UAA drivers need to be eliminated. Listed here are the steps it is advisable comply with
- Use the Home windows + X hotkey to open the facility person menu.
- Choose the System Supervisor choice. You’ll be redirected to a window known as the System Supervisor.
- Subsequent, choose the System Units choice after which broaden it.
- Proper-click on the Microsoft UAA Bus Driver for Excessive Definition Audio choice after which choose Disable.
- Click on on the Sure button to verify it.
- Now press the Win+I keys to open Home windows Settings.
- Go to Apps > Apps & Options.
- Click on on the Realtek Excessive Definition Audio driver and choose the Uninstall choice.
- Then open System Supervisor once more.
- Proper-click on the disabled Microsoft driver.
- From the menu record, choose the Uninstall button.
- Now that you’ve executed this, restart your system.
- Run the installer to finish the method.
3. Replace Realtek driver utilizing System Supervisor
One other technique you should use to repair this error is to replace the Realtek driver utilizing the System Supervisor. To take action, do the next.
- Press the Home windows+R keys to open the Run dialog field.
- Contained in the textual content field, kind
devmgmt.mscand press Enter. This can open System Supervisor. - Scroll down and broaden the Sound, video, and recreation controller choices.
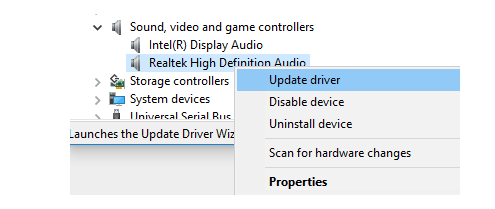
- Then right-click on Realtek Excessive Definition Audio and choose the Replace driver choice from the choice record.
- In case your laptop has the newest driver setup file, choose the Browse My Laptop for drivers choice.
- Now click on on the Let me choose from a listing of accessible drivers on my laptop choice to indicate obtainable drivers suitable with the system.
- Search and choose the newest driver after which click on the Subsequent choice.
4. Add Legacy {hardware}
Even in case you are nonetheless unable to replace the Realtek drivers, don’t fear. Open the System Supervisor and use the Add Legacy {hardware} choice utilizing the next steps –
- Proper-click on the Begin menu and choose the System Supervisor choice.
- Now seek for Sound, video, and recreation controllers after which click on it as soon as discovered.
- Click on subsequent on the Motion tab.
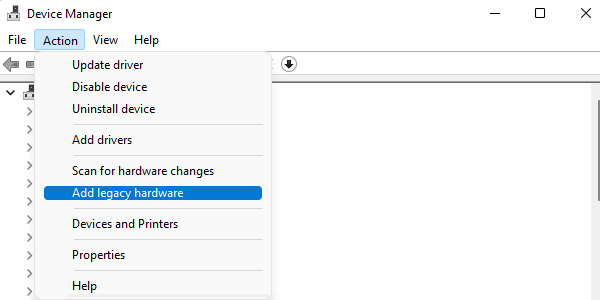
- Choose the Add Legacy {hardware} choice from the menu record.
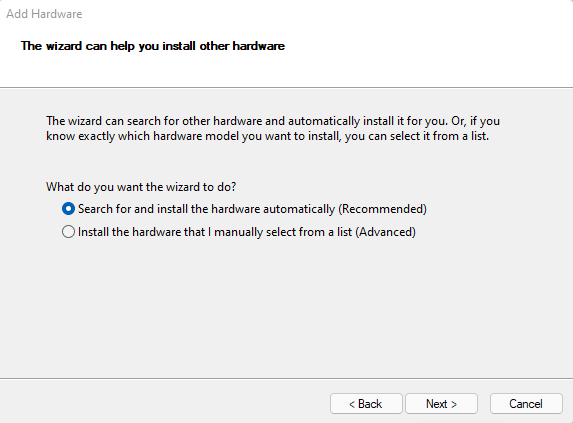
- Click on on the Subsequent button after which choose the Seek for and set up the {hardware} mechanically (Really useful) choice.
- Now click on the Subsequent button after which set up the motive force manually.
Hopefully, finishing the steps above will enable you to resolve audio driver points and enhance sound high quality.
Learn Subsequent:
- Repair- Realtek Excessive Definition Audio Concern on Home windows 10
- Learn how to Repair Realtek Audio points in Home windows 11