On Home windows 10 (and older variations like Home windows 7 and eight), typically, you could must shrink or prolong the accessible area of a given partition to make room to create extra partitions utilizing the unallocated area or retailer extra information on the identical part of the drive.
There are various causes to vary the dimensions of a partition. For instance, you could need to shrink the first partition to create space for creating one other partition and dedicating completely different areas for various functions, like one for Home windows (C drive by default) and one other in your information (D drive).
If you wish to setup a dual-boot system in your laptop, you could create separate partitions for every one to forestall the necessity for one more bodily drive.
Some customers separate partitions to enhance safety by isolating essential system information from consumer information.
What’s a drive partition, and the distinction between it and quantity?
A partition is a method to divide the uncooked storage contained in the exhausting drive into completely different logical sections, which then act as separate drives within the working system, though they’re within the bodily disk.
Typically, a “partition” may also be confused with a “quantity,” whereas these phrases could be interchangeable, there are some variations.
A partition is a logical division of bodily storage on a tough disk drive (HDD) or solid-state drive (SSD). Alternatively, a quantity is a formatted part of storage that, on this case, Home windows can acknowledge and entry. Sometimes, a quantity features a file system (comparable to NTFS or ReFS) that enables Home windows to arrange and handle information.
Generally, a single partition turns into a single quantity, however some superior configurations can mix a number of partitions right into a single quantity and even span volumes throughout a number of bodily disks.
Regardless of the motive, Home windows 10 contains a number of instruments to resize a partition with out formatting or risking information loss, together with the legacy Disk Administration device, Command Immediate, and PowerShell.
Whenever you use both of those instruments, you possibly can change the partition measurement on the “C” drive and secondary drives, together with inside and exterior storage and USB flash drives.
On this information, I’ll clarify the steps to shrink and prolong the dimensions of a partition on Home windows 10 with out third-party instruments.
- Change partition size from Disk Management on Windows 10
- Change partition size from Command Prompt on Windows 10
- Change partition size from PowerShell on Windows 10
Change partition measurement from Disk Administration on Home windows 10
The legacy Disk Administration device is the simplest method to shrink or prolong the partition measurement with out formatting. This feature is accessible on Home windows 11 and 10 in addition to older variations, comparable to Home windows 8 and seven.
Shrink partition measurement with Disk Administration
To cut back the partition measurement with Disk Administration, use these steps:
-
Open Begin on Home windows 10.
-
Seek for Create and format exhausting disk partitions and click on the highest end result to open the Disk Administration console.
-
Proper-click the drive you need to change its partition measurement and choose the Shrink Quantity choice.

-
Verify the quantity of area to shrink the partition (in megabytes).
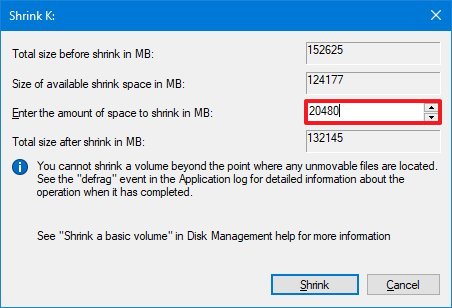 Fast word: As you modify the dimensions worth, you possibly can verify the entire measurement of the unallocated area after shrinking the unique partition.
 -
Click on the Shrink button.
When you full the steps, the drive partition will probably be lowered to the desired measurement.
Lengthen partition measurement with Disk Administration
To extend the drive partition measurement from Disk Administration, use these steps:
-
Open Begin.
-
Seek for Create and format exhausting disk partitions and click on the highest end result to open the Disk Administration console.
-
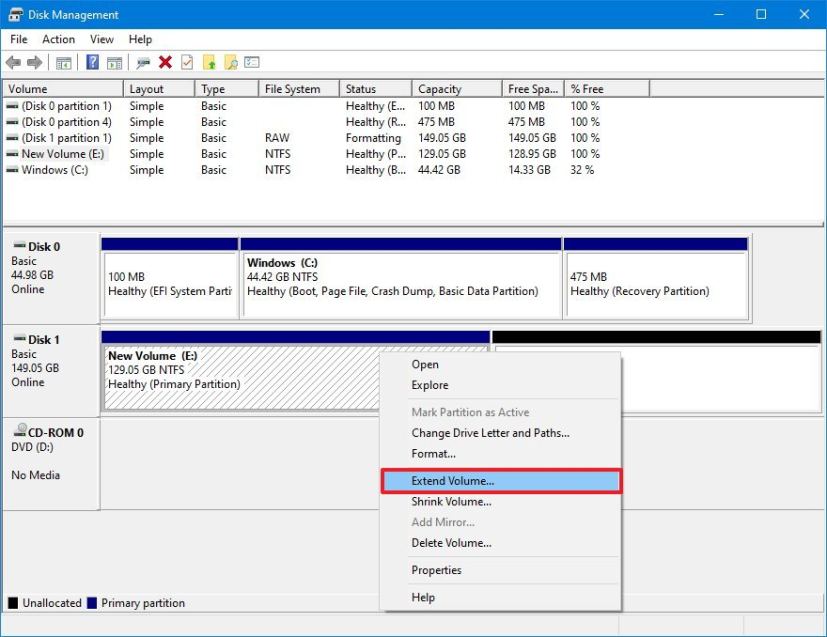
Proper-click the drive to vary its partition measurement and choose the Lengthen Quantity choice.
-
Click on the Subsequent button.
-
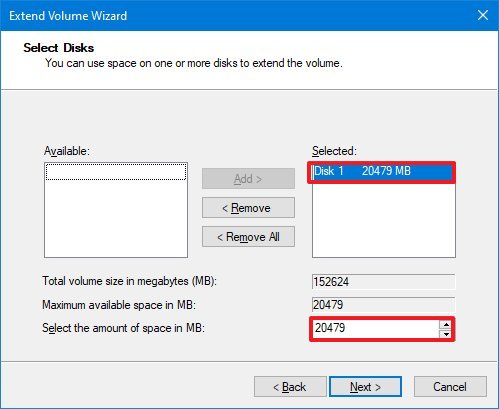
Select the disk with accessible area below the “Chosen” part (if relevant).
Fast word: In some circumstances, you could want to pick the disk from the “Accessible” part after which click on the “Add” button to make it accessible. -
Verify the area to make use of to extend the drive partition (if essential).
-
Click on the Subsequent button.
-
Click on the End button.
After finishing the steps, the partition will change to the desired measurement. If the “Lengthen quantity” choice is greyed out, the bodily drive doesn’t have any area to extend the amount.
Change partition measurement from Command Immediate on Home windows 10
If you should use instructions to resize a partition on Home windows 10 with out dropping information, use the diskpart device with Command Immediate.
Shrink partition measurement with diskpart
To shrink a partition with Command Immediate, use these steps:
-
Open Begin.
-
Seek for Command Immediate, right-click the highest end result, and choose the Run as administrator choice.
-
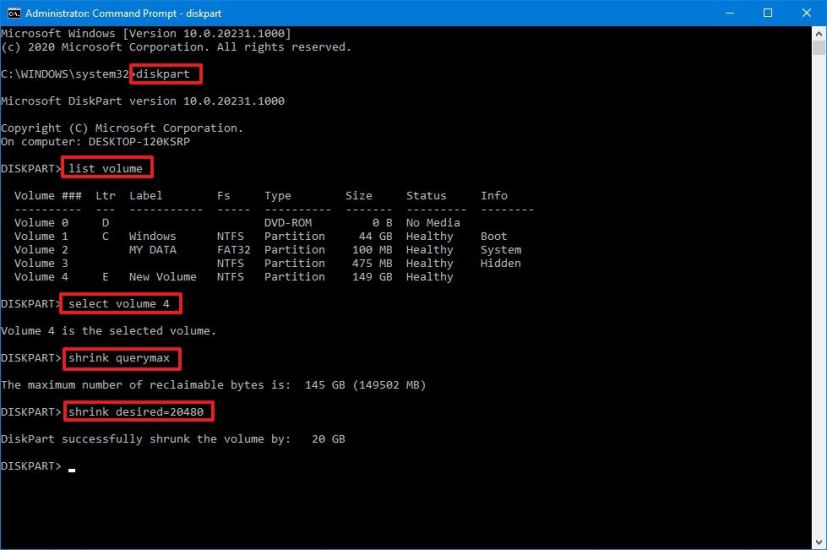
Sort the next command to start out diskpart and press Enter:
diskpart
-
Sort the next command to listing the volumes and press Enter:
listing quantity
-
Sort the next command to pick the amount to shrink the partition and press Enter:
choose quantity 4
Within the command, change 4 for the quantity representing the partition you need to modify.
-
Sort the next command to find out the area you possibly can lower the partition and press Enter:
shrink querymax
-
Sort the next command to shrink the drive partition by a certain amount (in megabytes) and press Enter:
shrink desired=20480
Within the command, change 20480 for the quantity (megabytes) you need to shrink the partition.
-
(Optionally available) Sort the next command to shrink the partition by its most area reclaimable and press Enter:
shrink
When you full the steps, diskpart will scale back the partition measurement to the brand new smaller measurement.
Lengthen partition measurement with diskpart
To extend the drive partition measurement with diskpart, use these steps:
-
Open Begin.
-
Seek for Command Immediate, right-click the highest end result, and choose the Run as administrator choice.
-
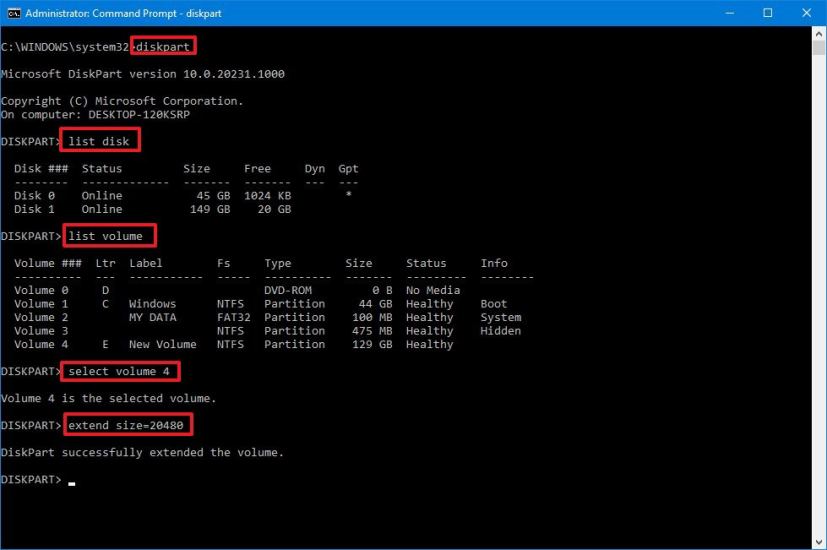
Sort the next command to start out diskpart and press Enter:
diskpart
-
Sort the next command to listing the accessible disks and their capability, and press Enter:
listing disk
Fast word: Establish the drive’s whole measurement with the partition to increase. -
Sort the next command to listing the volumes and press Enter:
listing quantity
-
Sort the next command to pick the amount to shrink the partition and press Enter:
choose quantity 4
Within the command, change 4 for the quantity representing the partition you need to modify.
-
Sort the next command to extend the dimensions of the partition and press Enter:
prolong measurement=20480
Within the command, change 20480 for the quantity (megabytes) you need to improve the partition.
-
(Optionally available) Sort the next command to extend the dimensions of the partition utilizing all contiguous free area that’s accessible on the drive and press Enter: prolong
prolong
After you full the steps, the partition will prolong to the brand new measurement with out dropping your information.
Resize partition utilizing PowerShell on Home windows 10
It’s additionally doable to make partitions smaller or bigger utilizing PowerShell instructions.
Shrink partition measurement with PowerShell
To make a partition smaller with PowerShell, use these steps:
-
Open Begin.
-
Seek for PowerShell, right-click the highest end result, and choose the Run as administrator choice.
-
Sort the next command to listing all of the drives and their whole measurement, and press Enter:
Get-Disk
-
Sort the next command to listing the accessible partitions on the drive and Enter:
Get-Partition -DiskNumber 1
Within the command, change 1 for the drive quantity with the partition you need to shrink.
-
(Optionally available) Sort the next command to grasp the minimal and most area you possibly can resize the partition and press Enter:
Get-PartitionSupportedSize -DiskNumber 1 -PartitionNumber 1
Within the command, change the variety of disks and partitions that correspond to your scenario. Additionally, SizeMin and SizeMax are laid out in bytes, which means you could want to make use of a web-based converter to grasp the data in gigabytes or another measurement.
-
Sort the next command to resize the partition to 20GB and press Enter:
Resize-Partition -DiskNumber 1 -PartitionNumber 1 -Dimension (20GB)

Within the command, exchange the disk and partition quantity and measurement for the data akin to your drive and the dimensions you need to shrink the drive. Additionally, I’m utilizing GB, however it’s also possible to specify the area in bytes, KB, MB, and TB
When you full the steps, PowerShell will shrink the partition to the desired measurement, leaving extra unallocated area to create extra partitions.
Lengthen partition measurement with PowerShell
To increase the partition measurement with PowerShell, use these steps:
-
Open Begin.
-
Seek for PowerShell, right-click the highest end result, and choose the Run as administrator choice.
-
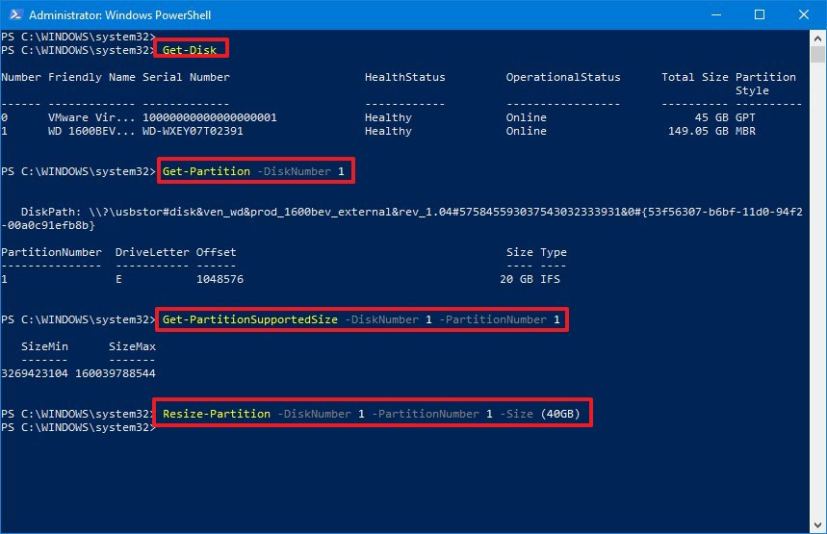
Sort the next command to listing all of the drives and their whole measurement, and press Enter:
Get-Disk
-
Sort the next command to listing the accessible partitions within the drive and press Enter:
Get-Partition -DiskNumber 1
Within the command, change 1 for the drive quantity with the partition you need to prolong.
-
(Optionally available) Sort the next command to grasp the minimal and most area you possibly can resize the partition and press Enter:
Get-PartitionSupportedSize -DiskNumber 1 -PartitionNumber 1
Within the command, change the disk and partition quantity to match your scenario.
-
Sort the next command to extend the partition to 40GB and press Enter:
Resize-Partition -DiskNumber 1 -PartitionNumber 1 -Dimension (40GB)
Within the command, exchange the disk quantity, partition quantity, and measurement for the data akin to your drive and the dimensions you need to improve the partition.
-
(Optionally available) Sort the next command to increase the partition to its most measurement and press Enter:
Resize-Partition -DiskNumber 1 -PartitionNumber 2 -Dimension 64407715328
Within the command, exchange the disk and partition quantity with the data that corresponds to your scenario. Additionally, to specify the brand new measurement of the partition, use the SizeMax quantity accessible in step 4.
After you full the steps, the partition will cowl the complete accessible area or the desired quantity.
It’s also possible to use third-party instruments like GParted to vary the dimensions or transfer the partition to a distinct part on the bodily exhausting drive.
Along with utilizing these instruments, it’s also possible to handle and create customized partitions whereas putting in Home windows 10. This method is useful to divide the drive area from the start, which many occasions is much less dangerous.
Replace April 12, 2024: This information has been up to date to make sure accuracy and mirror adjustments to the method.