The error code 0x80300024 is an set up error and usually happens if you attempt to set up the Home windows working system in your laptop. On this publish, now we have lined all the explanations that will set off this error and 6 workarounds that ought to assist to eliminate this downside. Once you encounter this difficulty, you might get an error message as effectively which resembles the next –
We could not set up Home windows within the location you selected. Please Verify youe media drive, Error 0x80300024
Studying the error message that it accompanies, hints in direction of a malfunctioning disk partition or the quantity the place you are attempting to put in Home windows. As a workaround, it’s best to attempt to tackle any corruption that lies on the laborious disk and try once more to put in Home windows 11/10.
What causes Error 0x80300024 whereas putting in Home windows 11?
Home windows 11 might fail to put in on error code 0x80300024 due to both of the next causes –
- Defective Peripheral gadgets plugged into your PC
- Utilizing the problematic USB port
- Incorrect Boot Sequence
- Not having sufficient areas on the foundation drive
- Corrupted Onerous Disk
Now that you already know what probably may have gone incorrect throughout Home windows 11/10 set up, let’s discover the methods that may repair this downside.
Observe: Earlier than you apply any answer, examine in case your gadget meets the minimal system necessities to put in a selected model of Home windows in your PC.
Repair – Home windows 11/10 Set up Error 0x80300024
These are the strategies that you could attempt to resolve Home windows set up points like Error 0x80300024 –
- Remove Peripheral devices
- Use different USB Port
- Check the Boot Sequence
- Clean up Storage Spaces
- Run DiskPart
- Inspect Hard disk
1] Take away Peripheral gadgets
Should you use secondary gadgets like Printers, Audio bars, and so forth. in your laptop, examine if they’re all right. Any fault inside them might stop you from putting in a brand new working system and even generally upgrading the OS.
As a thumb rule, it’s best to unplug all of your peripheral gadgets besides the Keyboard and Mouse. After eradicating all secondary gadgets (together with any further laborious drives), examine if now you can set up the brand new OS in your laptop.
2] Use totally different USB Port
A defective USB port in your PC may additionally make it tough to learn what’s contained in the set up media. As a workaround, unplug the USB flash drive and plug this into another port. Verify if now you can carry out the Home windows 11 or 10 set up.
In case the set up received’t begin even after making certain these preliminary checkups, transfer on to the subsequent set of options mentioned under.
3] Verify the present Boot Sequence
The present Boot sequence in your laptop issues so much whereas putting in a brand new working system. Say, the SATA drive is chosen as the primary Boot order in your PC. If that’s the case, your gadget will learn the SATA drive as an alternative of studying the USB drive first. Right here’s how will you change the boot sequence in your PC –
- To begin with, restart your PC.
- Whereas it’s loading, press the Operate keys (F1/F2/F6), or Del keys as well inside your system BIOS.
- After coming into BIOS, go to the Boot tab. Right here, one can find the choice to vary your gadget’s present boot order/configuration.
- Set the USB Flash drive/Detachable gadgets because the “First Boot gadget“.
Observe: In case you’re planning to put in Home windows OS utilizing some CD, make “CD-ROM” the “First Boot gadget”.
- The laborious drive (HDD or SSD) ought to be set because the “Second Boot gadget“.
- Press the F10 key to save lots of the present configuration and are available out of the BIOS.
Now that you’ve got modified the present Boot order in your PC, re-plug the set up media, and restart your PC. Whereas Home windows is loading, press the bootable key (F10, F12, or Esc ) to land on the Boot Order web page. Choose the gadget containing the bootable media, and Home windows set up will start shortly afterward.
Observe: Ensure to format the drive on which you’ll set up the brand new working system.
Methods to format SSD partition on Home windows 10 PC
4] Clear up Storage Areas
Not having sufficient space for storing on the disk drive the place you want to set up the brand new OS may additionally end in errors like 0x80300024. It’s fairly frequent to put in the working system on the earlier root drive.
As this drive was already in use, it should have some unnecessarily saved cache, previous Home windows installations, or different non-essential recordsdata. Because of this, if you strive putting in the brand new working system on this drive with out formatting it, this will set off errors like 0x80300024.
To resolve this difficulty, you might both go for a clear set up or wipe out the areas which can be unnecessarily saved by recordsdata that don’t matter. Disk Cleanup is an ideal software that you need to use to unencumber sufficient disk area to proceed with the Home windows set up.
5] Run DiskPart
The set up error 0x80300024 may additionally happen if there are any points with the prevailing drive partitions in your laptop. As a way to repair this difficulty then, you might take the assistance of an inbuilt utility program – “DiskPart”. Utilizing this software, one can simply resolve points associated to disk partitions. Right here’s how you need to use DiskPart in Home windows –
Methods to Take away or Delete a Drive Partition on Home windows 10
- Press Win + R to launch the Run dialog.
- Kind “CMD” within the textual content area, and press Ctrl + Shift + Enter keys altogether.
- When the Command Immediate opens up, execute the under codes one after one other –
diskpart
checklist disk
- Ensure to press Enter individually to open DiskPart and think about the obtainable disks in your PC.
- Establish the disk partition quantity that accommodates the working system. By default, this ought to be the primary drive i.e. C:.
- Kind the under command subsequent and press Enter once more –
Choose Disk 1
- When you find yourself inside the foundation drive, kind “Clear“, and press the Enter key.
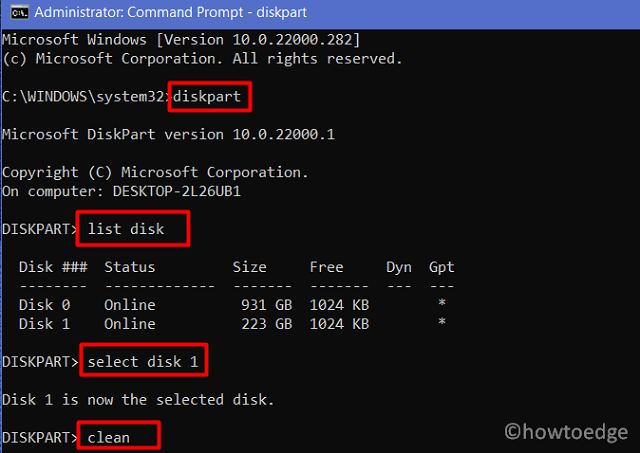
- Performing so will completely erase/destroy all knowledge on the chosen drive.
Now that you’ve got worn out all knowledge on the foundation drive, examine if can now set up Home windows 11/10 with out stepping into error 0x80300024.
6] Examine Onerous Disk
In case not one of the above options work to resolve the set up error 0x80300024, your laborious disk should have been corrupted. You might examine your laborious drive utilizing the CHKDSK command. Right here’s the right way to carry out this job –
- Launch CMD as administrator.
- When the UAC prompts, hit Sure.
- On the elevated console, kind the next, and press Enter.
chkdsk C: /f /r /x
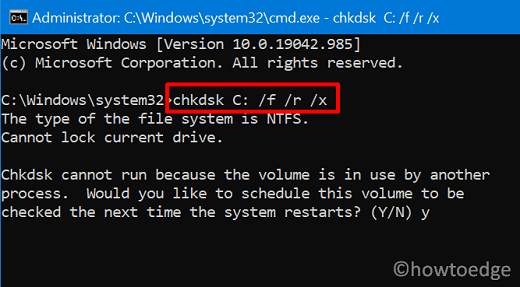
Observe: Within the command above, the totally different letters imply the next –
C: – The drive that you just need to examine
/f: – permission to repair any points when discovered
/x: – Verify the disk to dismount the drive earlier than starting the duty
/r: – Search Restoration for the unhealthy sectors on the laborious disk
- Since you are attempting to examine the foundation drive and this should be already in use, the CHKDSK command won’t run. As an alternative, this may ask your permission to start this scan if you restart your PC.
- Kind “Y”, and press Enter to substantiate the HDD Scan after the PC reboots.
- Restart your PC subsequent and let the laborious disk scanning start.
- When the above scan completes, you’ll get a report on whether or not you’ll be able to nonetheless use your laborious disk or not.
In case your HDD has turn out to be corrupted, substitute it with a brand new laborious disk (SSD could be higher), and clear set up Home windows 11/10.
Nonetheless, having points whereas putting in Home windows 11/10? Nicely, you might check out this PC restore software to seek out and repair points routinely in your laptop.