On Windows 11, File Explorer comes with some default settings, and while they should be good enough for most users, there are some features you’re probably not using designed to make managing your files a breeze.
For example, you can show extensions to simplify identifying and renaming files. The Gallery page allows you to add more locations in addition to the “Pictures” folder. You can pin items to the navigation pane for faster access to frequent folders and Recycle Bin. Also, it’s possible to customize the properties of a folder to optimize the browsing experience.
In this guide, I will outline several features of File Explorer to help you improve your overall experience.
Features you must configure on File Explorer for Windows 11
You can customize various settings on File Explorer to improve your experience browsing and managing files, and here’s how.
1. Enable extensions for files
To enable file extensions for files, use these steps:
-
Open File Explorer.
-
Click on the View menu button and then open the Show submenu.
-
Choose the “File name extensions” option.
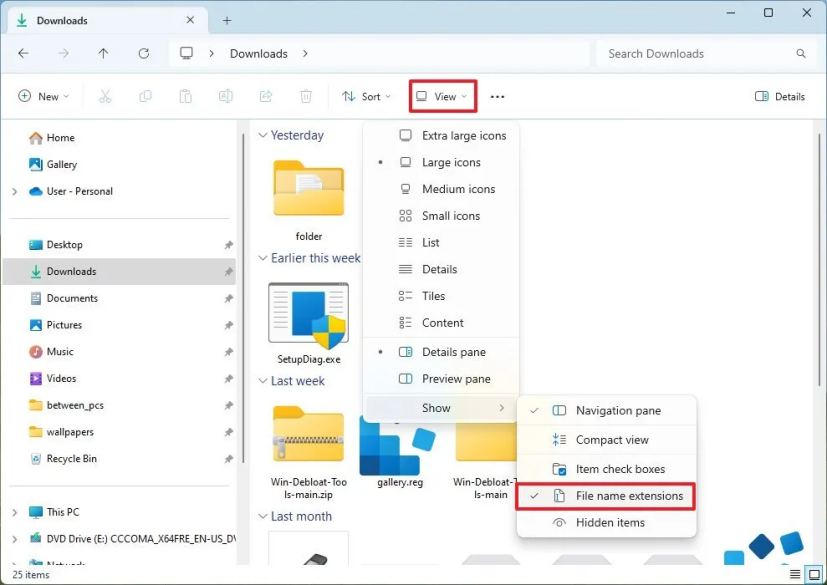
Once you complete the steps, you will be able to see the extension for the different file types.
This option usually comes in handy when you have to identify the file type or change the file format using another extension. For example, it can be used to avoid renaming “script.txt” to “script.bat.txt.”
2. Add locations to Gallery
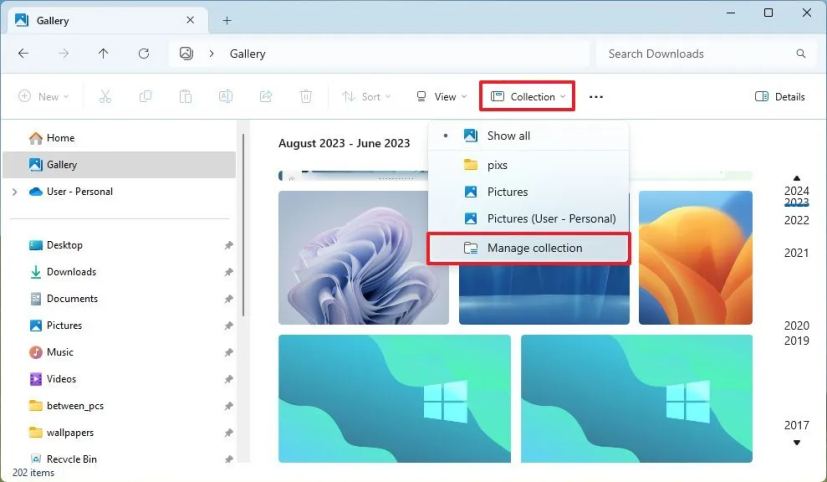
To add folder locations to the Gallery page on File Explorer, use these steps:
-
Open File Explorer.
-
Click on Gallery from the left pane.
-
Click on the Collection menu button and choose the Manage collection option.
-
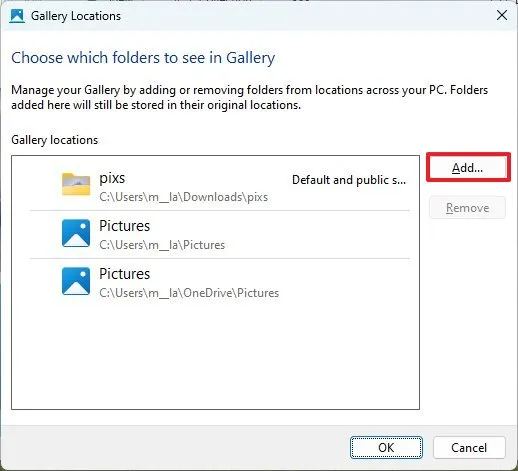
Click the Add button.
-
Select a new folder location.
-
Repeat steps 4 and 5 to add more locations.
-
(Optional) Choose the folder from the left and click the Remove button for those locations you don’t want to appear in the Gallery.
-
Click the OK button.
After you complete the steps, similar to the Photos app, File Explorer will start populating the images in the collection.
This feature is useful to include every location on your computer containing images in a single location. And “yes,” you can add network locations through a mapped drive or network path.
If the feature isn’t for you, use these instructions to disable the Gallery entry from File Explorer.
3. Pin folders to Quick access
To pin folders to Quick access on File Explorer, use these steps:
-
Open File Explorer.
-
Open the folder you use frequently.
-
Click the View button from the command bar and choose the “Pin to Quick access” option.

-
Repeat steps 2 and 3 to add more locations.
Once you complete the steps, you will have access to the folder from the left navigation page and the “Home” page.
Usually, since the list of folders can get long quickly, it’s best only to pin those locations you typically access frequently. You can always right-click the item and choose the “Unpin from Quick access” option.
4. Show Recycle Bin on navigation pane
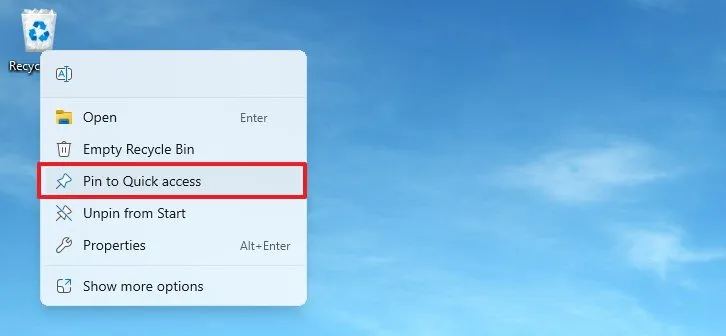
To make Recycle Bin accessible from File Explorer, use these steps:
-
Right-click the Windows 11 desktop, select Show, and choose the “Show desktop icons” option (if applicable).
-
Right-click the Recycle Bin icon and choose the “Pin to Quick access” option.
After you complete the steps, you will have quicker access to your deleted files, allowing you to restore or empty the trash to free up space on Windows 11.
You can also use these instructions to integrate the Recycle Bin into File Explorer.
5. Customize folders
To customize the folder properties on File Explorer, use these steps:
-
Open File Explorer.
-
Open a location with folders.
Quick tip: Usually, you want to customize folders containing similar file types. -
Right-click the folder and choose the Properties option.
-
Click the Customize tab.
-
Use the “Optimize this folder for” setting and choose “Documents,” “Pictures,” “Music,” or “Videos.”
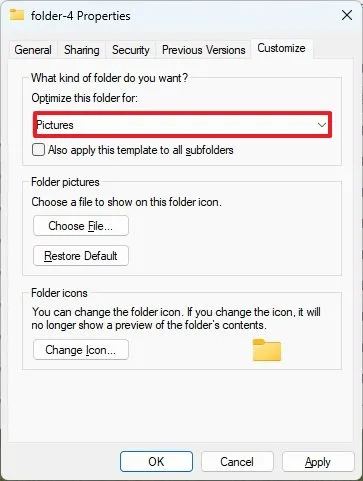 Quick tip: The template only applies to the folder. You must check the “Also apply this template to all subfolders” options to propagate the settings to all folders in this location.
 -
(Optional) If the folder contains images, you can customize the “Folder pictures” setting to show a main photo in the folder instead of letting the system choose a thumbnail for you.
-
(Optional) Use the “Folder icons” option to change the folder icon for another system icon.
-
Click the Apply button.
-
Click the OK button.
Once you complete the steps, File Explorer will apply the new settings to the folder.
Although, for the most part, you’re not required to customize your folders, it’s a good practice to organize your content. For example, if you have a folder that only includes images, changing the settings will allow you to show thumbnails instead of file names. Also, you can assign custom icons or images to the folder to add visual cues to make it easier to identify the folder.
Furthermore, choosing a template based on the file types in the folder can help to optimize the browsing speeds and overall experience.
Do you know another feature that can improve the file manager experience? Start the conversation in the comments.