Some customers encountered Error Code 0x80240031 whereas trying to improve their Home windows 10 OS to a more moderen construct. This error code typically happens because of the broken system recordsdata or corrupted registry recordsdata.
Earlier this error was solely related to Home windows 8 and Home windows 8.1 however these days it has turn into a severe concern for Home windows 10. Should you’re searching for any decision to keep away from this downside then this text might enable you.
On this article, now we have included some efficient workarounds which will seemingly enable you to repair this concern. So let’s see easy methods to repair this error.
Methods to repair replace error code 0x80240031 in Home windows 10
To repair replace error code 0x80240031 in Home windows 10, use the steps –
Options Record
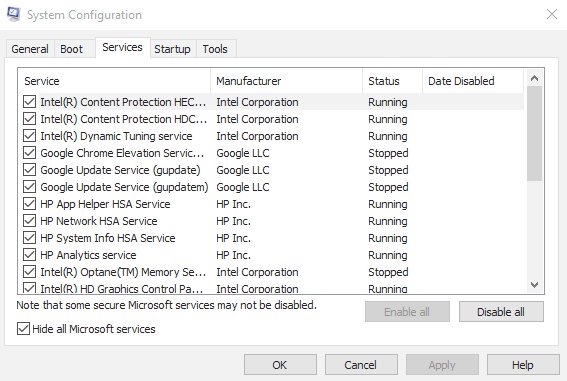
1. Carry out a clear boot
- Press the Home windows+S shortcut key to open the Home windows Search bar.
- Within the textual content bar, sort System Configuration and press Enter.
- As soon as the System Configuration window opens, swap to the Companies tab.
- Now go to the left backside nook and mark the checkbox subsequent to Disguise All Microsoft Companies.
- Then click on Disable all obtainable on the right-bottom.
- Go to the Startup tab and hit Open the duty Supervisor.
- Within the Process Supervisor, choose the providers one after the other and hit the Disable button.
- Repeat this course of till you flip off all of the operating providers.
- Now shut the window and again to the System Configuration web page once more.
- Click on Apply > OK button to save lots of the modifications.
- Restart your pc.
When you full the method, attempt to set up the replace once more and verify if it really works.
Now open the System Configuration once more as defined above. On the Basic tab, choose Regular Startup. Then go to the Companies tab and unmark the Disguise all Microsoft providers choice.
After that, transfer to the Startup tab and choose Open Process Supervisor hyperlink. Within the Process Supervisor, choose Allow All to activate all startup packages. Lastly, hit OK and restart your machine.
2. Run System File Checker and DISM Instrument
If performing the clear boot doesn’t repair it then run the System File Checker software to repair the corrupted or broken system recordsdata. To proceed, comply with the directions beneath:
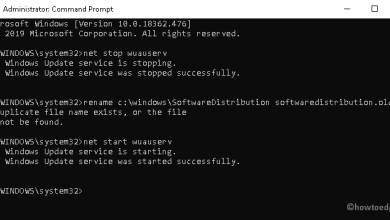
- To begin with, open the command immediate with admin rights.
- Within the elevated command immediate, sort the beneath command and press Enter.
sfc /scannow
- This can take a few minutes to finish the looking out/repairing course of, so wait until then.
- As soon as it’s over, restart your pc to use the modifications.
Now run Deployment Picture Servicing and Administration (DISM) scan to restore the corrupted system recordsdata. Listed here are the steps:
- Open the elevated command immediate once more.
- Kind the next instructions and hit enter after every one –
Dism /On-line /Cleanup-Picture /ScanHealth
Dism /On-line /Cleanup-Picture /CheckHealth
Dism /On-line /Cleanup-Picture /RestoreHealth
-
It could take a few minutes to complete the work. So wait patiently with out intervening it. As soon as it accomplished, restart your PC to use the modifications.
3. Disable the Graphics Card Driver
Typically all these issues additionally happen because of the graphics card driver put in in your pc. So, we propose you disable your graphics card driver quickly after which attempt to improve your working system. Right here is easy methods to do:
- Proper-click on the Begin button and choose Gadget Supervisor from the menu listing.
- As soon as the Gadget Supervisor opens, go to the Show Adapters after which increase it.
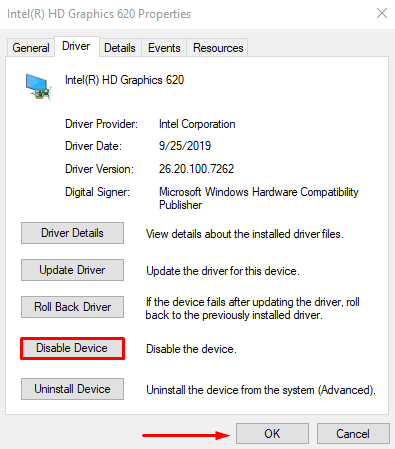
- Now right-click your graphics card and choose Properties from the choices.
- Within the Properties window, go to the Driver tab and choose Disable Gadget.
- Then click on the OK button to save lots of the modifications.
Now reboot your pc and verify if it really works. When you’ve full the method efficiently, navigate to the producer web site, and set up the most recent model of your driver.
4. Carry out an Computerized Restore
If you’re nonetheless encountering Error 0x80240031 whereas upgrading Home windows, we advocate you to carry out an automated restore. Listed here are the steps:
- Launch Home windows Settings utilizing Win+I shortcut key.
- Choose Replace & Safety >Restoration.
- In the fitting pane, click on Restart now below Superior Startup.
- As soon as it begins up, navigate to Troubleshoot >Superior Choices >Computerized Restore.