Are you experiencing an replace error 0x8024a203 when putting in a brand new replace to your Home windows 11/10 PC? Do you get the error message ceaselessly and the replace fails to put in? If that’s the case, then let me inform you that you just aren’t alone. Many Home windows customers have skilled the error 0x8024a203 when putting in updates on their PC. On this put up, we’ve compiled an inventory of options that will make it easier to resolve this difficulty.
What’s Home windows Replace Error 0x8024a203?
An error like 0x8024a203 is extraordinarily annoying and causes customers to be irritated unnecessarily. After a 100% obtain of Home windows 11, this error causes the set up to return to 41% and ultimately reveals you a blue display of error.
Easy methods to Repair Replace Error 0x8024a203 on Home windows 11/10
All through this information, we now have listed all of the efficient options that you should utilize with a view to resolve Home windows 11 replace error 0x8024a203. To take action, you’ll be able to strive the next:
- Run Windows Update Troubleshooter
- Restart Windows Services
- Run System File Checker
- Reset Windows Update Components
- Manually download and install updates
1. Run Home windows Replace Troubleshooter
The built-in troubleshooter ought to at all times be your first step when encountering Home windows replace errors. This software doesn’t at all times repair the issues mechanically, however it could actually establish what must be addressed. Under are the steps to observe:
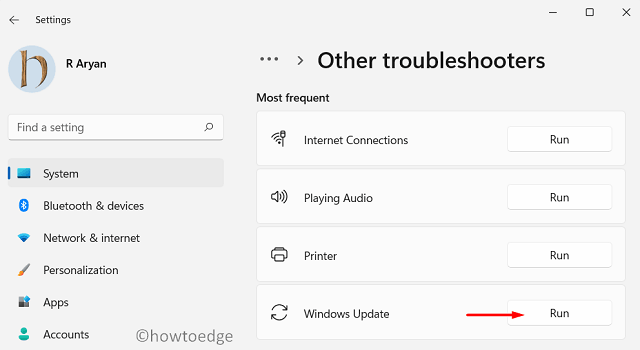
For Home windows 11
- Proper-click on the Begin menu and select Settings.
- Click on System within the left-hand menu.
- Scroll down and choose Troubleshoot.
- Subsequent, click on Different troubleshooters.
- Go to the Home windows Replace troubleshooter and click on the Run button.
- Observe the troubleshooting directions displayed on the display.
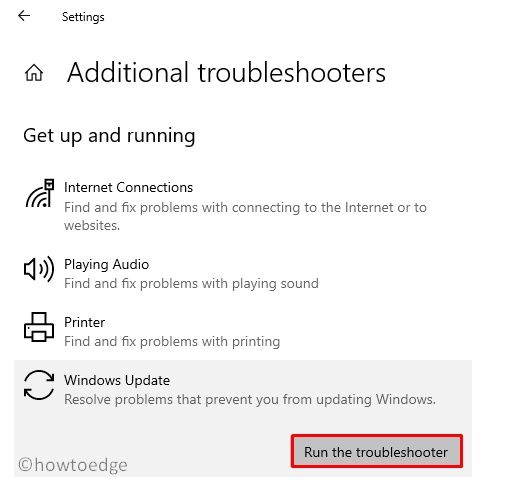
For Home windows 10
- Press the Home windows+I keys to launch the Settings app.
- Choose Replace & Safety > Troubleshoot > Further troubleshooters.
- Develop Home windows Replace after which click on Run the troubleshooter.
- If the issue persists, strive the following answer.
2. Restart Home windows Providers
Service background processes are essential to make sure updates are profitable. The replace would possibly fail if a few of them are damaged or not operating. In such circumstances, chances are you’ll wish to restart them utilizing the under steps:
- Press the Home windows+R keys to launch the Run dialog field.
- Kind providers.msc within the search field and press Enter.
- Now scroll down and double-click on the Background Clever Switch Service (BITS) service.
- On the following web page, set the Startup sort as Automated and ensure the Service standing is Operating.
- In case it’s Stopped, click on on the Begin button to activate it.
- In the identical method, verify for different providers like Home windows Replace.
3. Run System File Checker
Subsequent, you’ll be able to carry out a verify through Command Immediate to verify your system doesn’t have any corrupted information. The next steps might help you in doing so
- Run the Command Immediate in administrator mode.
- Within the command immediate window, copy and paste the under command and press Enter:
sfc /scannow
- The scan will take a couple of minutes to finish. Whereas the code is being scanned, you’ll be able to deal with some other job you need.
- Restart your pc as soon as it has completed scanning.
4. Reset Home windows Replace Elements
Attempt to reset the Home windows Replace elements through the Command Immediate and see if it helps.
- Click on on the Begin button and kind cmd.
- Proper-click on the Command Immediate and choose Run as administrator from the context menu.
- If the Person Account Management immediate seems, faucet Sure once more.
- Now copy and paste the next command strains after which hit the Enter key after each.
web cease bits
web cease wuauserv
web cease appidsvc
web cease cryptsvc
- Operating the above command strains will forestall the right functioning of the Background Clever Switch Service (BITS), Home windows Replace service, and Cryptographic service.
- Now run the under command to take away all of the qmgr*.dat information that happen contained in the BITS.
Del "%ALLUSERSPROFILEpercentApplication DataMicrosoftNetworkDownloader*.*"
- When the affirmation message seems, sort Y to delete the information.
The subsequent step is to clear the Home windows Replace cache utilizing the next code. Then, retry downloading the updates.
rmdir %systemrootpercentSoftwareDistribution /S /Q
rmdir %systemrootpercentsystem32catroot2 /S /Q
- Afterward, you’ll need to reset the Home windows Replace Service and BITS. Press Enter after every command.
sc.exe sdset bits D:(A;;CCLCSWRPWPDTLOCRRC;;;SY)(A;;CCDCLCSWRPWPDTLOCRSDRCWDWO;;;BA)(A;;CCLCSWLOCRRC;;;AU)(A;;CCLCSWRPWPDTLOCRRC;;;PU)
sc.exe sdset wuauserv D:(A;;CCLCSWRPWPDTLOCRRC;;;SY)(A;;CCDCLCSWRPWPDTLOCRSDRCWDWO;;;BA)(A;;CCLCSWLOCRRC;;;AU)(A;;CCLCSWRPWPDTLOCRRC;;;PU)
- You need to now transfer to the System32 folder by operating the under command:
cd /d %windirpercentsystem32
- After that, it is best to register all of the information on BITS and Home windows Replace DLLs within the registry. To perform this, you need to execute the next instructions one after the other.
regsvr32.exe atl.dll
regsvr32.exe urlmon.dll
regsvr32.exe mshtml.dll
regsvr32.exe shdocvw.dll
regsvr32.exe browseui.dll
regsvr32.exe jscript.dll
regsvr32.exe vbscript.dll
regsvr32.exe scrrun.dll
regsvr32.exe msxml.dll
regsvr32.exe msxml3.dll
regsvr32.exe msxml6.dll
regsvr32.exe actxprxy.dll
regsvr32.exe softpub.dll
regsvr32.exe wintrust.dll
regsvr32.exe dssenh.dll
regsvr32.exe rsaenh.dll
regsvr32.exe gpkcsp.dll
regsvr32.exe sccbase.dll
regsvr32.exe slbcsp.dll
regsvr32.exe cryptdlg.dll
regsvr32.exe oleaut32.dll
regsvr32.exe ole32.dll
regsvr32.exe shell32.dll
regsvr32.exe initpki.dll
regsvr32.exe wuapi.dll
regsvr32.exe wuaueng.dll
regsvr32.exe wuaueng1.dll
regsvr32.exe wucltui.dll
regsvr32.exe wups.dll
regsvr32.exe wups2.dll
regsvr32.exe wuweb.dll
regsvr32.exe qmgr.dll
regsvr32.exe qmgrprxy.dll
regsvr32.exe wucltux.dll
regsvr32.exe muweb.dll
regsvr32.exe wuwebv.dll
DLL denotes the registry file elements, whereas regsvr32 represents the information that must be registered. Equally, /S will execute these codes silently, with out prompting.
- After that, it is best to reset the community configuration that’s inflicting the issue. Run these codes:
netsh winsock reset
netsh winsock reset proxy
- This can immediate a window asking “Restart the pc”.
- After the following login, chances are you’ll begin again the Home windows providers like BITS, Home windows Replace, and Cryptographic providers which you have got earlier blocked. To carry out this, execute these codes on the elevated Command Immediate.
web begin bits
web begin wuauserv
web begin appidsvc
web begin cryptsvc
-
After finishing the above steps, Restart your system once more.
That’s all. I hope all the pieces is operating easily with Home windows Replace. After you have reset the Home windows Replace Elements, now you can verify to see in the event you can set up pending updates in your PC.
5. Obtain and set up the updates manually
If not one of the choices listed above be just right for you, you’ll need to manually obtain and set up the replace from the Microsoft Replace Catalog.
Learn Subsequent:
- Easy methods to Repair Replace Error 0x800f080a in Home windows 11/10
- Easy methods to Repair Replace Error 0x80070714 in Home windows 11/10