On Windows 11, you can remove the Gallery page from File Explorer, and in this guide, I will show you the steps to complete this configuration.
“Gallery” is a new page that Microsoft introduced in File Explorer as part of the Windows 11 23H2 release. It offers a view identical to the one available in the Photos app. The page previews images with larger thumbnails, hides the file name, and uses chronological sorting. It even includes settings to add and remove folders from the view.
Although it can be a convenient experience for many users, in my case, I never actually use this feature. I’m already comfortable using the Photos app, and if I need to find a specific image, I just browse the folder directly. If this feature isn’t for you either, File Explorer doesn’t include an option to disable the Gallery, but you can use the Registry to remove it completely.
In this guide, I will outline the steps to use the Registry to get rid of the Gallery entry on File Explorer.
Remove Gallery from File Explorer
To remove the File Explorer Gallery page on Windows 11, use these steps:
-
Open Start on Windows 11.
-
Search for regedit and click the top result to open the Registry.
-
Navigate to the following path:
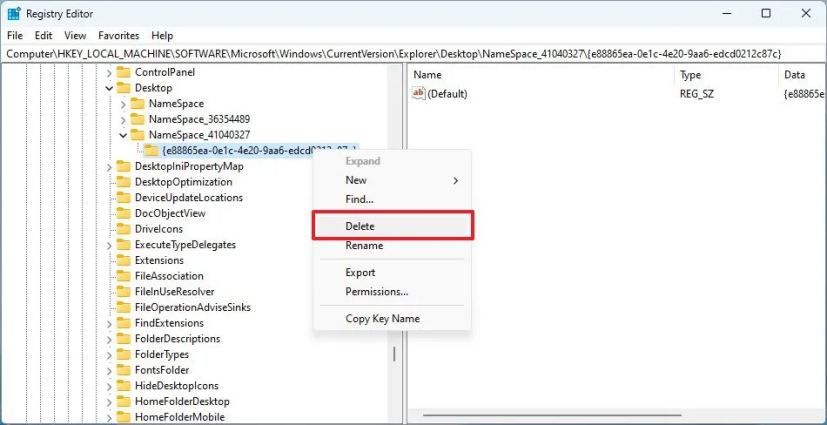
HKEY_LOCAL_MACHINE\SOFTWARE\Microsoft\Windows\CurrentVersion\Explorer\Desktop\NameSpace_41040327
-
Right-click the {e88865ea-0e1c-4e20-9aa6-edcd0212c87c} key and select the Delete option.
Once you complete the steps, the Gallery page will no longer appear on the left navigation pane the next time you relaunch File Explorer.
If you want to revert the changes, you can use the same instructions, but on step 3, right-click the “NameSpace_41040327,” select New, choose the Key option, name it {e88865ea-0e1c-4e20-9aa6-edcd0212c87c}, and press Enter. Inside the new key, right-click the default String, set its value to {e88865ea-0e1c-4e20-9aa6-edcd0212c87c}, and click the “OK” button.
Do you use this image viewer or plan to remove it? Share your thoughts, and let me know if this worked for you.